
Make this holiday one your family will remember forever! With these 19 simple and fun patterns, even first-time knitters can create beautiful Christmas stockings for everyone on Santa’s list. Gwen W. Steege offers innovative ideas for crafting unique stockings full of personality, regardless of whether you’re looking for wacky or whimsical, classically beautiful or daintily darling. Transform smaller skeins and project leftovers into ministockings for pets or tree ornaments. Clear some room on the mantle and knit yourself a merry little Christmas.
PLEASE NOTE: The patterns and instructions in this ebook rely on color illustrations and color sequences, and they will not fully render on black-and-white reading devices.


Knit Christmas Stockings, 2nd Edition: 19 Patterns for Stockings & Ornaments
136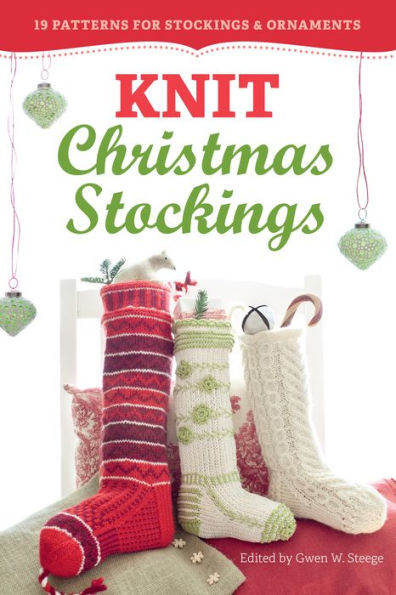
Knit Christmas Stockings, 2nd Edition: 19 Patterns for Stockings & Ornaments
136eBookSecond Edition (Second Edition)
Available on Compatible NOOK devices, the free NOOK App and in My Digital Library.
Related collections and offers
Overview
Make this holiday one your family will remember forever! With these 19 simple and fun patterns, even first-time knitters can create beautiful Christmas stockings for everyone on Santa’s list. Gwen W. Steege offers innovative ideas for crafting unique stockings full of personality, regardless of whether you’re looking for wacky or whimsical, classically beautiful or daintily darling. Transform smaller skeins and project leftovers into ministockings for pets or tree ornaments. Clear some room on the mantle and knit yourself a merry little Christmas.
PLEASE NOTE: The patterns and instructions in this ebook rely on color illustrations and color sequences, and they will not fully render on black-and-white reading devices.

Product Details
| ISBN-13: | 9781612122533 |
|---|---|
| Publisher: | Storey Publishing, LLC |
| Publication date: | 08/27/2013 |
| Sold by: | Hachette Digital, Inc. |
| Format: | eBook |
| Pages: | 136 |
| File size: | 16 MB |
| Note: | This product may take a few minutes to download. |
About the Author
Gwen W. Steege is the coauthor of The Weaving Explorer. She has been weaving for nearly 35 years and has exhibited her work in western Massachusetts, where she lives. For many years she acquired and edited a line of craft books at Storey Publishing focused on spinning, dyeing, knitting, crochet, and weaving. She is the author of a number of knitting books, including The Knitter’s Life List.
Read an Excerpt
CHAPTER 1
STOCKINGS UP!
A hand-knit Christmas stocking is bound to be a treasure for years to come, whether you lovingly knit one as a gift or create a set for your own family. In the pages that follow, we offer a wide variety of styles, so you're sure to find one that's perfect for the spotlight it will claim in your home. Some of our patterns are as traditional as the holidays themselves, while others offer a new twist to classic ideas, with their bright and surprising color combinations. You'll find several felted knitting projects, multicolor patterns, and some interesting textural designs. Some of the stockings are extra large; in contrast, you'll find mini socks, as well as miniature mittens and sweaters just right for hanging on the tree or even packaging small gifts. Everyone seems to want to knit socks these days, and knitting a roomy Christmas stocking is a wonderful way for novice knitters to learn some basic sock-knitting techniques. Plus, no second-sock syndrome: you have to knit only one! So choose a pattern from our collection of talented designers, pick up your needles and yarn, and get set to knit a true Christmas heirloom!
Yarns to Yearn For
Today's yarn selection makes knitting more fun than it's ever been before. The stockings in this book were knit with yarns of varied fiber content and weight. We tell you exactly which yarns the pictured stockings were knit with, but we hope that you'll enjoy experimenting with your own color combinations and yarn varieties — wool, cotton, synthetics, and blends, and maybe even luxury fibers. After all, a very special stocking may someday become a family heirloom. The choice is yours, as long as you keep in mind that you must get the gauge indicated by the pattern (see page 10). Also, if you choose one of the felted projects, be sure to use only 100 percent wool or another animal fiber that will shrink effectively (see Yarns for Felting, below).
Be sure to buy enough yarn to complete your project. You'll find information about the number of skeins needed for each pattern in this book, along with the weight and yardage of the skeins we used. If you substitute, be sure to compare your yarn's yardage to the pattern requirement. Yardage is usually listed on the label; if not, ask your yarn shop to check the manufacturer's specifications. It's always a good idea to buy an extra skein to avoid running short; most yarn shops accept returns of untouched skeins of yarn as long as you do so within a reasonable length of time. Check your shop's return policy.
Getting Equipped
Most knitters have strong preferences when it comes to selecting knitting needles, and the wide variety of choices can be confusing until you try them. Coated aluminum needles are durable but sometimes heavy in larger sizes. I find that slippery yarns tend to slide rather easily off metal needles. Plastic or similar materials are lighter, though they can bend or break, and yarn sometimes sticks to them. Depending on the yarn you're working with, bamboo or wood needles may be a good compromise. The yarn moves smoothly along them, even in hot, sticky weather, and they're quiet and comfortable to use.
Most of the patterns in this book are knit on double-pointed or circular needles. Available in several lengths, circular needles have a flexible nylon or plastic center cable. Double-pointed needles come in sets of four or five. If you've always used four for knitting in the round, you'll find knitting with five is easier and less likely to leave telltale lines (known as ladders) between the needles.
The size of knitting needles is indicated by number. It's important to note whether the size is US, UK, or metric — they're all different! The chart on page 8 gives equivalent sizes for all three. You'll note that in the US system 0 is very small, whereas in the UK system 0 is large. This book provides US and metric (but not UK) sizes in all the instructions.
Do Bag It!
Although you can get started on most projects with little more than yarn and needles, a nice, well-supplied knitting bag, like all tool kits, makes life easier. Here are some suggestions for things you might need:
* Straight, circular, and double-pointed needles in assorted sizes
* Crochet hooks in small, medium, and large sizes
* Retractable tape measure and a 6-inch metal ruler with needle gauge
* Needle point protectors, to keep yarn from slipping from needles
* T-pins, to help you block and shape the finished item
* Blunt-tipped tapestry needles, for sewing seams and weaving in ends
* Small, sharp scissors
* Stitch holders, as well as safety pins for holding small numbers of stitches
* Stitch markers, round and split
* Cable needles
* Sticky tags or see-through removable tape, to mark your place in patterns and charts
One Good Turn
You may have heard enthusiastic new sock knitters proudly talk about learning to "turn the heel." Although it may sound somewhat esoteric, there's really no mystery to turning a heel, once you understand the principle. Turning the heel is a key step in shaping the stocking, taking you from the tube that forms the leg, accommodating the larger-diameter section around the ankle, and merging into the slimmed-down area that is the foot.
The heel is turned by working what are known as short rows at the bottom of the heel flap (see Anatomy of a Sock, page 5) while you're still knitting back and forth in rows and before you begin to knit the instep circularly. The number of stitches in the heel flap varies from pattern to pattern, of course, but you are usually instructed to knit about two-thirds of the way across the row, work two stitches together, knit another stitch, and then turn to go back the other way, leaving the remainder of the stitches behind, unworked. The trick is that you must believe this and follow the directions, even if they seem odd to you! If you are working stockinette stitch, you slip the first stitch after you turn, then purl a certain number of stitches, but only as far as the pattern directs. Again, work two stitches together, purl one, and then turn to go back the other way. This is when you see the magic begin! When you come to the place in the row where you turned (just after the two stitches you worked together), you'll see a very noticeable gap between the slipped stitch of the row before and the first unworked stitch. Work the two stitches on either side of the gap together, work the next stitch, and turn. The pattern directions will inform you about the number of stitches to work, but you'll soon get used to the visual clues and be able to confidently anticipate where to decrease. Continue in this way until all the stitches have been worked.
Wrap & Turn
When working short rows as described above, some sock knitters use a "wrap and turn" (W&T) method to eliminate the small hole that may appear when you turn in the middle of a row. On knit rows, work up to the turning point, slip the next stitch purlwise onto the right-hand needle with yarn in back. Move the yarn between the needles to the front of the work, return the slipped stitch to the left-hand needle, and turn to work in the other direction. If you're working stockinette stitch, move the yarn between the needles to the front and begin to purl; if you're working garter stitch, leave the yarn at the back and begin to knit: W&T is complete. On purl rows, work up to the turning point, then slip the next stitch purlwise onto the right-hand needle with yarn in front. Move the yarn between the needles to the back of the work; return slipped stitch to the left-hand needle, and turn to work in the opposite direction. Move the yarn between the needles to the back and begin to knit: W&T is complete.
Watch Those Swatches
Even though Christmas stockings don't have to fit and you want to get going on your project just as soon as possible, it really does pay to take time to knit a swatch. Gauge matters even when fit doesn't, as the perfect gauge means that your fabric isn't either sleazy because the stitches were too loose, or stiff because the stitches were crammed in too tight. Swatching is how you test the number of stitches per inch you'll be getting with the yarn and needles you're using. Always calculate your gauge over at least 4 inches. That's because counting stitches over just 1 inch can be misleading if your stitches are uneven or the stitch count within that inch comes up with a fraction. Here's an example of how to knit a swatch and figure out gauge:
Step 1. If the pattern gauge is 16 stitches = 4 inches on size US 7 (4.5 mm) needles, use these needles to cast on about 24 stitches. (You need a few extra stitches so that you don't have to measure the edge stitches, which may be uneven or draw in.)
Step 2. Following the stitch pattern you'll be using for the main part of your project, knit a swatch about 5 inches long. Block it as you plan to block the finished item
Step 3. Lay the swatch on a firm, flat surface, taking care not to stretch it. Uncurl the side edges and lay a flat ruler across the swatch. Count the number of stitches within 4 inches. There should be exactly 16.
Step 4.If your swatch contains more than 16 stitches in 4 inches, use larger needles and knit another swatch, repeating steps 1 through 3. If your swatch contains fewer than 16 stitches in 4 inches, use smaller needles and knit another swatch, repeating steps 1 through 3.
Note. Always use fresh yarn to check your gauge. Used yarn may have stretched and thus give an inaccurate measurement. Also, if two needle sizes are specified for a pattern and you change your larger-size needles to obtain the correct stitch gauge, adjust the size of the smaller needles to correspond. Finally, even after you have established what needle size and yarn gives the right gauge, check again after you have knitted a few inches into the project to make sure your gauge is holding true.
Casting On
Using a long-tail cast on makes an especially neat, firm but elastic edge. If you tend to cast on tightly, you may want to switch to one needle size larger for this step.
Step 1. Estimate how long to make the tail by wrapping the yarn around the needle one time for each cast-on stitch you need, then adding a few extra inches. Make a slip knot right here, and slide the knot over a single knitting needle. Hold that needle in your right hand; hold the tail and the working end of the yarn in your left hand as shown. Insert the needle over the front of the tail on your thumb and up through the middle of the loop.
Step 2. Insert the needle over the front of the working yarn on your index finger and draw a loop of it through the loop on your thumb.
Step 3. Release the loop on your thumb, place your thumb underneath the tail, and snug the new stitch onto the needle. The stitch should be well formed, but not too tight. As you make additional stitches, try to keep them as consistent as possible.
Binding Off
Binding off is sometimes called casting off. The simplest way to bind off is to work two stitches, then draw the first one over the second. Don't pull too tightly, or your edge will be puckered and inelastic. Continue to work a stitch, then carry the stitch already on the needle over the newly made one. When you reach the last stitch, pull the working end through the stitch.
Loose-Method Bind Off
If you tend to bind off tightly, you may want to switch to one needle size larger. Or, try this:
Step 1. Work two stitches. Insert your needle in the first stitch, use the left-hand needle to draw it over the second stitch, but instead of completing the bind off and dropping the first stitch, leave it on the left needle.
Step 2. As you work the next stitch, allow the first stitch to drop off the needle.
Continue in this way until all stitches are bound off.
Three-Needle Bind Off
This is a useful technique if you want to bind off and join two pieces in an invisible seam at the same time. Place half the stitches on one needle and half on a second needle. Holding the needles in your left hand, bring the two pieces, or two halves, together with the right sides facing. The tips should be pointing in the same direction, with the yarn attached to one of the halves at the beginning of the needle.
Step 1. Insert a third needle through the first stitches on the front and back needles, and knit them together.
Step 2. Make a second stitch in the same way, and then pass the first stitch over the second one. Repeat until you've bound off all stitches.
Note: Instead of executing this technique with right sides together, which creates an invisible seam on the right side of the fabric, you can do it with wrong sides together, creating an interesting raised design element on the fabric.
On the Decrease
As with increasing, decreasing can become an interesting design element in your project, and pattern directions usually specify which method to use. The three techniques shown here are the most common. Because the first two (ssk and psso) result in a finished stitch that slants to the left, they are often used at the right-hand side of an item; the last method (K2tog) results in a right-slanting stitch and so is used on the left-hand edge.
ssk
The first method is called "ssk" (slip, slip, knit the two slipped stitches together). Slip two stitches, one at a time, from your left-hand needle to your right, as if to knit (knitwise). Then slide the left-hand needle from left to right through the front loops of the slipped stitches, and knit the two stitches together from this position. This technique makes a finished stitch that slants to the left on the finished side and is often used at the beginning of a row.
psso
To "psso" (pass slipped stitch over knit stitch), slip one stitch from the left to the right-hand needle, inserting the needle as if to knit the stitch, but without knitting it. Knit the next stitch, then draw the slipped stitch over the just-knitted stitch. The finished stitch will slant to the left on the finished side.
K2tog
For a finished stitch that slants to the right on the finished side, simply knit two stitches together by inserting the needle into both loops, just as you would to knit. K2tog (knit 2 together) is generally used at the end of a row.
On the Increase
Increases allow you to shape your knitting as you work. Sometimes you'll want these increases to be invisible, but in other cases the increase stitches are not only noticeable but important design elements. It's helpful to learn a variety of techniques so that you can pick and choose whatever is appropriate for your needs. The illustrations that follow show three increase methods: bar increase, make 1 with a right slant, and make 1 with a left slant.
Bar Increase
The bar increase is a tight increase that leaves no hole but shows as a short, horizontal bar on the right side of the fabric. Make it by knitting into the front of the loop in the usual way, but do not remove the stitch from the needle. Instead, knit into the back of the same stitch, and slip both new stitches onto the right-hand needle. This is often called a knit-front-back (kfb) increase.
For a bar increase of two stitches, work into the front loop, the back loop, and the front loop again before taking the three new stitches off the needle.
Make 1, right slant
Step 1. Look for the horizontal bar between the first stitch on your left-hand needle and the last stitch on your right-hand needle. With the tip of your left needle, pick up this bar from back to front.
Step 2. Knit into the bar from the front, which twists the new stitch and gives it a slant to the right. Even though it may seem a bit difficult to get your needle into the bar from front to back, it's important to do so in order to avoid creating a small hole in the fabric.
Make 1, left slant
Step 1. Again using the tip of your left-hand needle, pick up the horizontal bar between the first stitch on your left-hand needle and the last stitch on your right-hand needle, this time from front to back.
Step 2. Now, knit into the back of the bar, which twists the new stitch to the left.
Note: To make 1 at the end of a round, pick up the horizontal strand between the first and the last stitch of the round.
Getting Around
Most of the knitting in this book is done on either circular or double-pointed needles, using a technique known as working in the round. Since you shape the item as you knit, there's usually little or no assembly to worry about once the knitting is complete. To make stockinette stitch when you knit in the round, you always knit on the right side, continuing around the circular or double-pointed needles without ever turning your work. (On straight needles, stockinette is created by knitting on one side, turning, and purling on the return.)
(Continues…)
Excerpted from "Knit Christmas Stockings"
by .
Copyright © 2013 Storey Publishing, LLC.
Excerpted by permission of Storey Publishing.
All rights reserved. No part of this excerpt may be reproduced or reprinted without permission in writing from the publisher.
Excerpts are provided by Dial-A-Book Inc. solely for the personal use of visitors to this web site.
Table of Contents
Stockings Up!
Winter Wonderland
Rustic Lodge
Reindeer & Bells
Pampered Pets (Kitten)
Pampered Pets (Puppy)
Christmas Sampler
Mix-and-Match Stockings
Jester's Bells
Star Brocade
Snazzy Argyles
Gifted Stocking
Victorian Flowers
Mini Socks
A Heart, a Star, and a Tree
Mini Felted Mitts and Socks
Ski Sweater Ornament
Contributing Designers
Acknowledgments
Index
What People are Saying About This
"Knit Christmas Stockings is a real treausure! It contains 17 clearly written patterns accessible to newer knitters plus hours ofknitting pleasure for the more experienced. Chock full of excellently illustrated techniques and knitting basics, the updated version of this classic deserves to be tucked into your knitting bag. Its colorful and creative stockings will delight their recipients, and there is no second sock worry for the knitter!"