Read an Excerpt
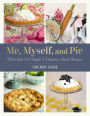
Me, Myself, and Pie
The Pinecraft Collection
By Sherry Gore ZONDERVAN
Copyright © 2014 Sherry Gore
All rights reserved.
ISBN: 978-0-310-33556-6
CHAPTER 1
The Amish Kitchen
My kitchen in Pinecraft reflects my personal style and disposition—sunny with a slight chance of rain. There's a hand-painted motto ("Life Is Short, Eat the Pie") on the wall next to my blue Hoosier cabinet where I store a litany of canning jars, vintage pie plates, lucky thrift store finds, and Amish/Mennonite cookbooks, and looking around you'll find no microwave in sight.
I do use electricity for my own cooking and baking, as do others in my community, but most Amish people, especially those in Old Order communities, do not. Their hand-crafted oak cabinets and drawers brim instead with wooden spoons, wire whisks, and mechanical egg beaters—the delightful armory of a cultural and yet capable kitchen. Some still prepare meals using a wood cookstove, while others enjoy the ease of natural gas or propane. Some without electricity even build separate kitchens down in their basements, for when summer heat spikes; a smart farmer has a cool place for produce, dry goods, and his wife.
Baker's Tools
There are some items that seem destined for any Amish kitchen, no matter the locale. One is a cloth linen calendar, often embroidered with an idyllic farm scene, and just as often recycled when the year is up into a lint-free tea towel. Another is a sturdy oak dinner table, handcrafted by local craftsmen and fit for as many as thirteen or more hungry children. Then there are the dessert plates, an Amish necessity, and high chairs. And rolling pins.
I say a girl can never have too many rolling pins. Of course I'm biased: the rolling pin is the most essential of the pie-making tools. Next would be a glass pie plate and a smooth countertop. After those, well, it gets a bit trickier, but here's a list of some basics to help you out. It's a lot, but don't get intimidated; there's no need for the pie baking novice to invest in anything but a rolling pin and a sweet tooth.
Pastry brush
Pie plates
Mixing bowl
Rolling pin
Measuring cups
Measuring spoons
Sharp paring knife
Butter knife
Wire whisk
Forks
Spoons
Baking sheet
Pot holders
Cutting board
Colander
Egg beater
Mixer
Saucepan
Rubber spatula
Beans or pie weights
Parchment paper
Baker's twine
Tin foil
Grater
Zester
Timer
Oven thermometer
Basic Ingredients
Baking is a science (they don't call it "pi" for nothing), and so you want to avoid deviating too much from your recipes unless you know what you are doing (or you wish to take a walk on the wild side). Try to remember that it is the pairing of butter or shortening with other specifically listed ingredients that will really define your crust—the underlying structure of any good pie—and that substitutions in fat ingredients can severely alter the outcome of your creation. Of course, for the tastiest pies, never substitute low-fat in place of full-fat, whole ingredients. The fat is where the flavor is, after all. It's a cliché, but it's true.
When storing pies, those of a cream variety should always be refrigerated before and after being served. Fruit pies fare better out on the countertop, but they never seem to last very long up there when baked properly. They get eaten!
Solid vegetable shortening (plain and butter-flavored)
Unsalted butter
White vinegar
Pure vanilla extract
Heavy cream
Whole milk
All-purpose flour
Granulated sugar
Light brown sugar
Powdered sugar
Cocoa powder
Eggs
Sanding sugar
CHAPTER 2
How to Make a Delicious Crust
This is where your pie adventure begins–with the crust. It is the crust that determines how your pie is classified in the culinary world.
There's more than one way to make a delicious crust. Some bakers utilize the most modern kitchen equipment with great results. It's a quick and efficient way to get a pie on the table. Others, like me, feel that to subject my pie crust to a food processor would be an outright assault. I need to feel my ingredients to know them. I work my crust over delicately with light, loving hands. It takes a bit longer, but in creating pies by hand, I've come to know them intimately. It's true; it's a relationship that requires time, commitment, and devotion—one that will last a lifetime.
Making Your Pie Crust
When mixing your dough ingredients, always use the least amount of water you can get away with.
Take care not to overwork the dough. Overworking the dough will leave you with a tough crust and disappointed pie eaters. Work the dough just long enough to incorporate all of the ingredients. You want to see streaks of butter or shortening in your dough. This makes for the most flavorful crust imaginable.
Place your cold dough on a lightly floured, nonstick surface. Flatten the dough a bit with floured hands. Begin rolling the dough from the center outward. Smooth the crust from the middle of the circle outward, getting rid of any bubbles and folds. Continue rolling until you have a perfectly flat circle big enough to generously cover a 9-inch pie plate. Using your rolling pin, roll up the dough and place it over the pie plate. Unroll and gently pat into place. Use a wet fingertip to patch any holes in your dough. If necessary, trim the edges with a paring knife before fluting or crimping. Pinch the crust edges together gently, rotating the pie as you work. Pressing the crust between two fingers and your thumb creates a beautiful scalloped edge, giving your pie a charming, homemade look. Don't bother trying to make your pie look store-bought or bakery perfect. You want your pie to look like you made it. Whose breath isn't taken away at the very sight of a fruit pie bubbling over the top, beckoning you to eat it? It's love in a pie pan.
For the best results, chill your pastry-filled pie plate in the refrigerator for about 10 minutes before adding your filling.
Before baking, use a sharp paring knife for scoring vents in the top pie crust. Or, for a spectacular presentation, use a cookie cutter to cut out designs in the top crust. Do this on a floured surface before laying the crust over the filled pie. Place your cut-outs on the top crust. Now is the time to add an egg or cream wash, if you are using one. Last, sprinkle with sanding sugar for sweet pies.
Blind Baking
Prebaking a pie crust is also called blind baking. This is the desired method used for frozen, custard, and cream pies.
There are two ways to prepare your crust for blind baking. Pricking the bottom of an unbaked pie crust with a fork is called docking. This prevents the bottom of the pie crust from puffing up.
You may choose to use pie weights. Pie weights are small, heavy objects used to weigh down your pie crust for prebaked pie crusts, which helps the crust bake evenly. This practice is commonly used for cream pie crusts.
Some bakers use uncooked rice or dried beans for pie weights. These make great substitutes for ceramic ball pie weights. Before filling your unbaked crust with weights, line the crust with a circle of parchment paper large enough to cover the sides of your pie pan before filling it with weights.
For a full blind bake, bake the crust at 425°F for 15 minutes. Reduce heat to 375°F. Remove the weights and return the crust to the oven until the desired color is achieved. Watch the crust carefully, because this won't take long.
Decorative Edges
You can create a surprising amount of variety with your edging techniques using very simple methods and tools. Be adventurous, combining some or all of these techniques to create pies that are uniquely yours!
Fancy Techniques
Pastry cut-outs and braids are the most time-consuming decorations, but they are also the most striking. You can braid strips of dough together and press the braid firmly onto the edge of the crust to create an elegant presentation.
Hand Techniques
Creating patterns with your fingers is simple and quick, and offers an array of stylings just by using slight variations with your hands.
Cutlery Techniques
Using forks and knives, you can quickly elevate your pie edges from boring to beautiful. Using forks and spoons offers an easy way to create geometric patterns. Have fun experimenting with your utensil drawer!
Wash Recipes
Whether you use an egg or cream wash on your pies, apply the wash to an unbaked crust just before placing in the oven. Applying the wash too soon will make your crust soggy and cause it to shrink down the sides of the plate. Using a cream wash gives your crust a golden-brown matte finish. This is my favorite method. You'll want to experiment to discover yours.
For an even appearance, brush the wash into all of the nooks and crannies of your crust. An egg wash gives your pie a dark, glossy appearance. Brush your egg wash on the crust just before baking.
1 egg yolk and 1 teaspoon water combined
1 egg yolk mixed with 3 tablespoons heavy cream
3 tablespoons heavy cream
1 egg yolk, 1 teaspoon milk, and pinch of salt combined
1 egg white
Pie Plates
Pie plates provide more than just a receptacle for delicious desserts. The material the pie plate is made of directly affects the consistency of the crust.
Dark Metal
Dark metal absorbs more heat than lighter metal, producing crisper crusts. Your crust may cook more quickly, so adjust your baking time as necessary
Metal
Metal pie plates are often cheap, lightweight, and durable. These are great for a variety of pies, but make sure the metal is strong enough to support the weight of your pie. Very acidic fillings may react with the metal, so choose your filling wisely. Metal conducts heat unevenly, so the crust may not cook uniformly.
Ceramic
Ceramic conducts heat just as well as glass, but this material allows for a beautifully decorated plate as well as a pie! If you are using a particularly thick ceramic dish, you may need to adjust your baking time accordingly.
Glass
Glass conducts heat evenly, making it easy to achieve a consistently cooked crust (and filling), and the ability to check the color of the crust while it bakes is invaluable.
Disposable Aluminum
These plates are great for picnics and ^ potlucks, but be careful not to overload the plate with filling. You may need to place the pie plate on a baking sheet to get the crust to cook evenly.
Crust Recipes
Pastry Crust
This flaky and decorative crust is a mainstay of the pie world. Often it seems that as the crust develops so do the skills of the baker, so when you finally perfect this recipe, you will have reached a level of true artistry—a Piecasso is born.
INGREDIENTS
2 cups all-purpose flour
1 tablespoon sugar (for sweet pies only)
1 teaspoon salt
¾ cup + 2 tablespoons butter-flavored vegetable shortening, chilled
5 tablespoons ice-cold water
1 tablespoon vinegar
TO PREPARE
Blend flour, sugar, and salt well in a large bowl. Cut the shortening into pea-sized pieces and work into flour mixture until crumbs form. In a separate bowl, mix together cold water and vinegar. Gradually add the water mixture to the flour mixture until combined. Shape the dough into a ball, cover in plastic wrap, and chill for at least 30 minutes.
On a lightly floured surface, roll out the dough to a uniform thickness. Place in a pie plate and trim the edges.
Bake at 400°F for 8–12 minutes, or until golden brown. Let cool. Makes two 9-inch pie crusts.
Sue's Singe Pastry Crust
This old homemade recipe still makes thousands of appearances on Amish windowsills across America. Who is Sue? Who knows? But if you ever find out, make sure to thank her for me.
INGREDIENTS
l ¼ cups vegetable shortening
3 cups all-purpose flour
l teaspoon salt
6 tablespoons cold water
TO PREPARE:
Place flour in a large bowl and cut in shortening. Add salt and water, and alternate adding 1 tablespoon at a time. Mix until well combined. Take care not to overwork your dough, as too much handling results in a tough crust. Gently work your dough ingredients together just long enough to fully incorporate them. You should see marbled streaks of fat once you've shaped the dough into a ball. Shape the dough into a ball, cover in plastic wrap, and chill for at least 30 minutes.
On a lightly floured surface, roll out the dough to a uniform thickness. Place in a pie plate and trim the edges.
Makes three 9-inch pie crusts.
Butter Pastry Crust
For butter lovers everywhere and the first choice for any baker planning a pot pie or savory pie, this crust is lighter and puffier than traditional recipes. Not to be confused with "Butter Pies," as in, "I liked everything she cooked butter pies." Don't get it? Try saying it out loud.
INGREDIENTS
3 cups all-purpose flour
1 teaspoon salt
1 cup butter, chilled and diced
6–8 tablespoons ice water
TO PREPARE
In a large bowl, combine flour and salt. Cut in butter until crumbs appear. Add water 1 tablespoon at a time. Shape the dough into a smooth ball, being careful to not overwork the dough. For best results, wrap the dough in plastic and refrigerate for at least 4 hours, or overnight.
Recipe may be halved for a single crust pie.
For a prebaked crust, bake at 400°F for 8–12 minutes, until golden brown.
Cheddar Cheese Crust
Add 1 cup of grated, sharp Cheddar cheese to the pastry crust dough ingredients before shaping into a ball.
Herbed Crust
Add 2 tablespoons of your favorite dried, crushed herbs to pastry crust dough.
Shortbread Crust
A sophisticated and debonair taste, shortbread traces back to Scotland, the land that brought us Sean Connery, and this crust pairs as nicely with fillings as he did with his leading ladies. Peach, pumpkin, strawberries, caramel, chocolate, banana cream—anything goes.
INGREDIENTS
½ cup butter, softened
¼ cup confectioners' sugar
1 cup all-purpose flour
1/8 teaspoon baking powder
TO PREPARE
Using a large bowl, cream butter and confectioners' sugar until light and fluffy. In a separate bowl, stir together flour and baking powder; blend into butter mixture. Pat dough into a 9-inch pie pan. Bake at 350°F for 12 to 15 minutes, or until edges are lightly browned.
(Continues...)
Excerpted from Me, Myself, and Pie by Sherry Gore. Copyright © 2014 Sherry Gore. Excerpted by permission of ZONDERVAN.
All rights reserved. No part of this excerpt may be reproduced or reprinted without permission in writing from the publisher.
Excerpts are provided by Dial-A-Book Inc. solely for the personal use of visitors to this web site.