


The Vegetable Gardener's Book of Building Projects: 39 Indispensable Projects to Increase the Bounty and Beauty of Your Garden
152


The Vegetable Gardener's Book of Building Projects: 39 Indispensable Projects to Increase the Bounty and Beauty of Your Garden
152Paperback
-
PICK UP IN STORECheck Availability at Nearby Stores
Available within 2 business hours
Related collections and offers
Overview

Product Details
| ISBN-13: | 9781603425261 |
|---|---|
| Publisher: | Storey Publishing, LLC |
| Publication date: | 04/17/2010 |
| Pages: | 152 |
| Sales rank: | 984,048 |
| Product dimensions: | 8.40(w) x 10.70(h) x 0.40(d) |
About the Author
Read an Excerpt
THE VEGETABLE GARDENER'S BOOK OF BUILDING PROJECTS
Storey Publishing
Copyright © 2010 Storey Publishing, LLCAll right reserved.
ISBN: 978-1-60342-526-1
Chapter One
BUILDING PROJECTS FOR PLANTING AND GROWING
Window Sash Cold Frame
Using a cold frame can extend your growing season four to six weeks on each end. Here is a good model that is straightforward to build, small enough to reach into easily yet large enough to help in your gardening, and a great use for any spare window sashes you may have on hand.
MATERIALS
Lumber
2"x4" cedar (10' length) 1"x6" cedar (12' length and 16' length) 1"x8" cedar (6' length) 1"x10" cedar (8' length) Two tomato stakes (27" lengths) Two 30"x29" window sashes
Supplies
Two pairs of 3 1/2"x2 1/2" exterior hinges and screws to go with them 2" exterior wood screws (70 or so) Two 1 5/8 exterior wood screws
Tools
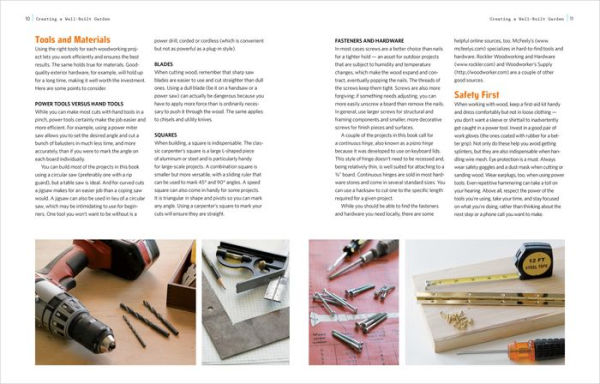
Tape measure Pencil Carpenter's square Wood saw Power drill 5/32" twist drill bit Driver bit to match screws
Cutting the lumber. From the 2"x4", cut three 19 1/2" lengths (A) and three 12 1/2" lengths (B) for the upright posts.
From the 1"x6", cut three 59 1/2" lengths for the lower front and back boards (C) and five 25 1/2" lengths for the side and center boards (D).
From the 1"x8", cut one 59 1/2" length for the upper front (E).
From the 1"x10", cut boards for the upper back (F) and angled upper sides (G) as specified in the cutting diagram at right.
Constructing the cold frame. To start, build the side panels using the taller upright posts (A) for the back corners and the shorter upright posts (B) for the front corners. The angled upper sides (G) will create a sloped top that both permits rainfall to run off the cold frame and allows for maximum sunlight to reach the plants inside. Screw the front boards (C) & (E) and back boards (C) & (F) to the ends of the side boards (D) & (G) to create a box. Then attach the center posts (A) & (B) to the inner box and screw the ends of the center board (D) to them.
Position the window sashes on the frame so that the tops are flush with the back wall (they will overhang the sides and front of the frame a bit), and mount the hinges. To provide ventilation, use the 15/8" screws to attach the bottoms of the tomato stakes to the inner front corners of the frame, as shown. The screws should be loose enough to allow the sticks to pivot forward when you want to prop the frame open.
Temperature
With a cold frame, the danger of heat and dehydration is far greater than the danger of cold, even during the early spring and late fall when you will be using your cold frame the most. Remember that even on the coldest winter day, the bright sun can quickly push the temperature in the cold frame up to above 75?-80?F (24?-27?C), which should be the maximum. Provide a system of props so that, if there is a chance of overheating, the sash can be raised. Unless prevailing winds blow directly into the cold frame, there is little danger of damaging plants through chilling them.
BUILDER'S TIP
The dimensions for this style of cold frame revolve around the window sashes you use. If yours are a different size than the 30"x29" ones specified here, you'll have to modify the frame accordingly. Either way, attaching the sashes with hinges that have loose pins will allow you to remove the windows easily if needed.
Shallow Raised Bed
When conventional gardening is not an option - if you don't have the space, perhaps, or the right kind of soil - raised beds are often a viable, if not advantageous, alternative. Beds with conservative widths (3'-5') allow you to reach into the middle to plant or weed without ever stepping on, and thus compacting, the soil. And the bench seats at the ends allow you to sit comfortably, as opposed to bending over while tending the bed.
MATERIALS
Lumber
2"x8" cedar (two 12' lengths)
Supplies
Twenty-four 3" galvanized wood screws
Tools
Tape measure Pencil Carpenter's square Wood saw Power drill 5/32" twist drill bit Driver bit to match screws
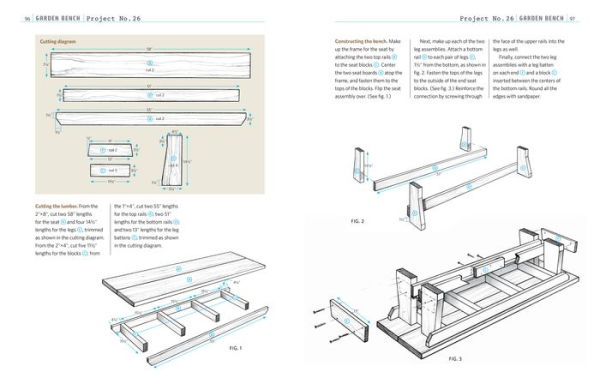
Cutting the lumber. Cut the cedar into two 72" lengths for the long sides (A), two 33" lengths for the short sides (B), and two 36" lengths for benches (C).
Constructing the bed. Create a rectangular frame by fastening the long sides (A) to the short sides (B), as shown. Then set the bench seats (C) atop the frame, flushing up the edges, and fasten them in place.
Setting up the bed. Locate the bed where it will catch full sun if possible. Mark off the size of the bed with stakes and string. Then use a shovel to dig down and remove all sod, grass, and weeds.
Preparing the Bed for Planting
While you can simply fill a raised bed with soil once it is built, doing some prior ground preparation will produce much better results. Once you've chosen a location (a spot that will provide full sun is ideal), remove any turf. Next, dig down, turning over a couple feet of subsoil. Finally, fill the bed with a good mixture of soil, compost, and manure, and level the surface.
BUILDER'S TIP
Adding bench boards to the ends of the raised bed not only provides a comfortable seat for weeding but also serves to strengthen the corners.
Deep Raised Bed
What's nice about a deep raised bed is that there is no need to remove the sod underneath it. You can simply fill it with soil and start planting.
MATERIALS
Lumber
4"x6" Douglas fir (ten 8' lengths)
Supplies
Fifty-six 6" timber-lock screws
Tools
Tape measure Pencil Carpenter's square Wood saw heavy power drill 1/2" spade drill bit 1/8" extra-long twist drill bit Driver bit that comes with the screws
Cutting the lumber. Cut the 4"x6" into ten 65 3/4" lengths for the long sides (A) and ten 29 3/4" lengths for the short sides (B).
Constructing the bed. Assemble the first layer on the ground by using two longer lengths (A) and two shorter lengths (B) to form a rectangle, as shown in fig. 1. Lay a second layer atop the first, alternating the timbers in the corners so that the joints are staggered (fig. 2). To prevent the wood from splitting, predrill holes, 1/2" deep and 1/2" wide, for the screws in the top layer, following the pattern provided in fig. 2. Then fasten down the wood, countersinking the screws so they are flush with the surface. Continue in this way, adding three more layers to the planter for a total of five layers.
BUILDER'S TIPS
Turn the boards so the best face is showing. When fastening each layer, flush up the edges and tack the four corners together before sinking the other screws.
Classic Compost Bin
This type of compost bin has been a popular choice for many years. it is easy to assemble and use -particularly when the compost is ready to turn. You simply take the sides apart, reassemble them beside the compost pile, and fork the pile back into the bin.
MATERIALS
Lumber
Two dozen 2"x2"x36" cedar balusters
Supplies
Four pieces of 36"x38 1/2" hardware cloth (with 1/2" squares) Sixty 2 1/2" pan-head exterior screws Two pounds 3/4" galvanized poultry staples Eight 2 1/2"-long hook-and-eye latches
Tools
Tape measure Pencil Carpenter's square Combination square Wood saw Power drill 5/32" and ?" twist drill bits Driver bit to match screws staple gun Work gloves awl Pliers Two clamps and wood blocks Tin snips hammer
Cutting the lumber. Cut the balusters into sixteen 36" lengths for framing the bin (A) & (B). Cut sixteen corner braces C with 45? angled ends; the braces should measure 18" from tip to tip.
Constructing the bin. Assemble each of the four panels, as shown in fig. 1, first attaching the upright balusters (B) to the ends of the top and bottom balusters (A). It's easier if you predrill the screw holes. Then fasten the four corner braces (C) in place. Working on a flat surface, attach a piece of hardware cloth to each panel, stapling every 3 1/2" or so along the perimeter and the braces. Use pliers to pull the cloth taut as you work.
Attach the panels to one another with hook-and-eye latches positioned 6" from the tops and the bottoms as in fig. 2. You can make a handy template for predrilling holes for the latches by marking spots 21/4" apart on the back of a business card and then holding the card against the wood and using an awl to poke through the card into the wood. Drill the holes with a 1/8" bit, angling them slightly toward the center of the wood (see fig. 3).
Turning the Pile
As is the case with many things, when it comes to compost bins, the simplest option is often the best. A prime selling point of this style of bin is that the mesh sides allow ample air circulation around the pile, which helps facilitate the aerobic bacterial action of breaking down the organic matter. Once a thermometer inserted into the pile reaches 110?-120?F (43?-49?C), turning the compost every three days or so helps hasten the decomposition process. When the pile reaches 140?-160?F (60?-71?C) and ceases heating up after being turned, the compost is fairly well sterilized and ready to use.
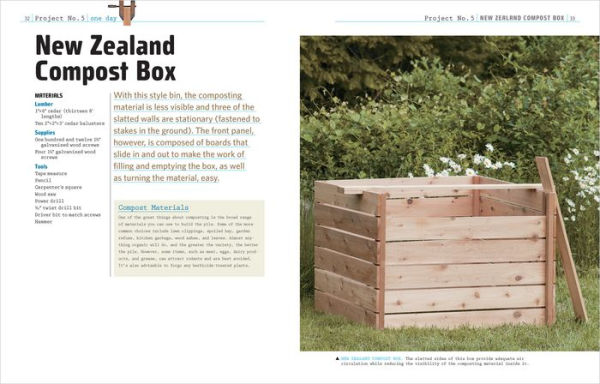
New Zealand Compost Box
With this style bin, the composting material is less visible and three of the slatted walls are stationary (fastened to stakes in the ground). The front panel, however, is composed of boards that slide in and out to make the work of filling and emptying the box, as well as turning the material, easy.
MATERIALS
Lumber
1"x6" cedar (thirteen 8' lengths) Ten 2"x2"x3' cedar balusters
Supplies
One hundred and twelve 1?" galvanized wood screws Four 1 1/4" galvanized wood screws
Tools
Tape measure Pencil Carpenter's square Wood saw Power drill 5/32" twist drill bit Driver bit to match screws Hammer
Cutting and drilling the lumber. From the 1"x6", cut a 59 1/4" length (A) and two 5" blocks (B) for the support bar, as well as twenty-four 47 3/4" lengths for the bin slats. Then predrill screw holes in six slats (C) for the back of the bin and twelve slats (D) for the sides, as shown in the cutting diagram. The remaining six slats (F) will be for the front of the bin. Use four of the cedar balusters to create stakes (G) by tapering the ends to points.
Constructing the box. Begin by building the three fixed panels. Start with the back, laying two inside corner balusters (E) on a flat surface and attaching the six back slats (C) to them. Screw the first slat flush to the top ends and side edges of the corners and the second slat 1/2" up from the bottom. Then fill in the space between them with the remaining four slats, spacing them about 1/2" apart. (See fig. 1.)
Next, make up the two side panels, but this time screw the front ends of the side slats (D) to one inside corner baluster (E) (which will be positioned at the front of the bin) and leave the back ends of the slats unscrewed. (You will attach them to the back panel once you locate the bin.)
Drive two stakes (G) into the ground about 37" apart where you want the back of the bin to stand. Lean the back panel against the stakes (the stakes should be on the outside of the bin), and screw the panel to the stakes. Then lean the side panels in place, and fasten the loose ends to the inside corner posts (E) of the back panels. (See fig. 1.)
Create a channel in the front corner of each side panel for installing the removable slats that will make up the bin's front panel. To do this, attach another corner post (E) parallel to the existing one, spacing the two just far enough apart for a slat (F) to slide between them. (See fig. 1.)
Next, partially sink 15/8" screws into either bottom edge of the six front slats (F) so that the heads are 1/2" above the wood (fig. 2). The screws will keep the boards properly spaced. Slide the slats down through the channels (with the screwed edges down). Finally, use the 1 1/4" screws to fasten a support block (B) to each end of the support bar (A) and set the bar across the top of the bin to keep the sides from spreading. Drive a stake (G) into the ground on each side of the bin, and fasten the bin to it from the inside.
Small Sifter
A joy of gardening is to work with screened compost when starting tiny plants or transplanting or repotting houseplants. This small sifter is ideal for one person to handle and should be sufficient for a modest garden. Just shake it back and forth, and the finer compost will fall to the ground, ready to use, while the rejected material remains in the sifter and can be returned to the compost pile.
MATERIALS
Lumber
5/4"x6" knotty cedar decking (6' length)
Supplies
eight 2 1/2" exterior decking screws 12"x18" piece of hardware cloth (with 1/2" squares) Handful of 1/2" galvanized staples
Tools
Tape measure Pencil Carpenter's square Power drill 3/16" twist drill bit Driver bit to match screws staple gun Tin snips hammer Work gloves
Cutting the lumber. Cut the decking into two 18" lengths for the long sides (A( and two 10" lengths for the short sides (B).
Constructing the sifter. Attach the long sides (A) to the ends of the short sides (B), first predrilling the screw holes. Then stretch the hardware cloth across the frame, and staple it along the edges.
BUILDER'S TIP
Nailing thin strips of wood over the edges of the hardware cloth will further strengthen the sifter and prevent the mesh ends from catching on your work gloves.
(Continues...)
Excerpted from THE VEGETABLE GARDENER'S BOOK OF BUILDING PROJECTS Copyright © 2010 by Storey Publishing, LLC. Excerpted by permission.
All rights reserved. No part of this excerpt may be reproduced or reprinted without permission in writing from the publisher.
Excerpts are provided by Dial-A-Book Inc. solely for the personal use of visitors to this web site.
Table of Contents
1 Building Projects for Planting and GrowingWindow Sash Cold Frame
Shallow Raised Bed
Deep Raised Bed
Classic Compost Bin
New Zealand Compost Box
Small Sifter
Large Sifter
Circle Plant Support
Horizontal Tomato Support
Cylindrical Tomato Cage
A-Frame Bean and Pea Support
T-Pea Tower
Handy House
Tool Rack
Potting Bench
Lattice Shade Cover
Hanging Planter
Window Box Planter
Square Planter
Welcoming Arbor
Garden Gate
Gate Latch
2 Building Projects for Harvesting and Preserving
Berry Box
Solar Dryer
Outdoor Storage Bin
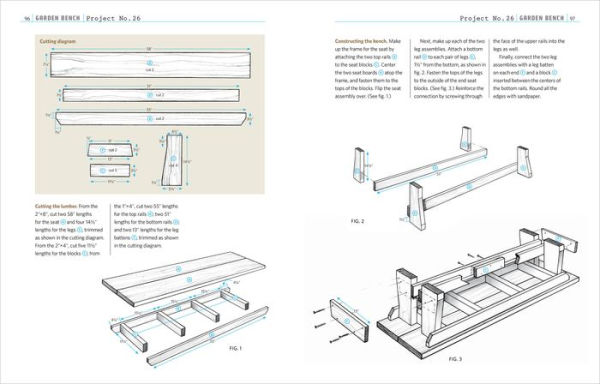
Garden Bench
Handy Lightweight Bench
3 Building Projects for Relaxing and Enjoying Your Backyard
Picnic Table
Adirondack-Style Lawn Chair
Westport Chair
Garden Swing
Pitched-Roof Birdhouse
Hinged-Roof Birdhouse
Nesting Platform
Platform Feeder
Single-Sided Hopper Feeder
Two-Sided Hopper Feeder
Weather Vane Feeder
Flower Press
Index
Related Subjects
Customer Reviews
Explore More Items

 (Fifty Shades Trilogy #3)")


")

")

")

")
")
")

