

eBook
Available on Compatible NOOK devices, the free NOOK App and in My Digital Library.
Related collections and offers
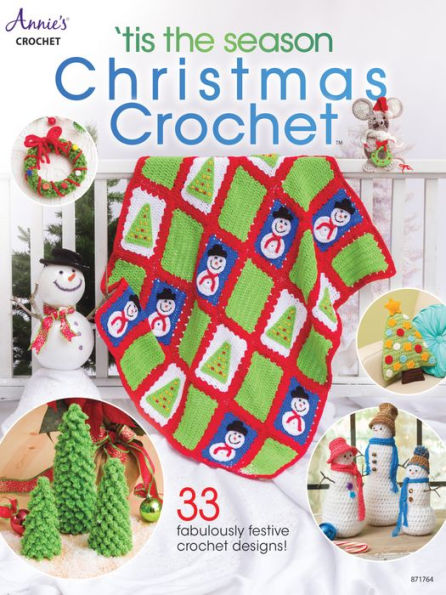
Overview

Product Details
| ISBN-13: | 9781640251267 |
|---|---|
| Publisher: | Annie's |
| Publication date: | 12/21/2019 |
| Sold by: | INDEPENDENT PUB GROUP - EPUB - EBKS |
| Format: | eBook |
| Pages: | 64 |
| File size: | 15 MB |
| Note: | This product may take a few minutes to download. |
About the Author
Read an Excerpt
CHAPTER 1
I'll Be Gnome for Christmas
Designs by Debra Arch
Skill Level
* EASY
Finished Measurements
2 inches wide × 5¼–8 inches tall, depending on shape of Hats
Materials
4
MEDIUM
• Medium (worsted) weight acrylic yarn:
40 yds red
25 yds each green and blue
15 yds white
• Red Heart Buttercup bulky (chunky) weight polyester/nylon yarn (1¾ oz/63 yds/50g per ball):
15 yds #4270 white
5
BULKY
• Size G/6/4mm crochet hook or size needed to obtain gauge
• Tapestry needle
• Hot-glue gun
• 15mm gold jingle bell
• 1½ × 21/8-inch wooden spool #9146-58 by Darice: 3
• 1½-inch ball knob #9104-07 by Darice: 3
• 10mm round wooden bead #9119-45 by Darice: 3
• White chenille stem #10427-10 by Darice: 3
Gauge
7 sc = 2 inches; 3 sc rnds = 1 inch
Pattern Notes
Weave in loose ends as work progresses.
Join with slip stitch as indicated unless otherwise stated.
Chain-2 at beginning of round counts as first half double crochet unless otherwise stated.
Chain-3 at beginning of round counts as first double crochet unless otherwise stated.
Elf
Body
Rnd 1 (RS): Beg at bottom of Body, with green, ch 16, join(see Pattern Notes) in first ch to form a ring, ch 2(see Pattern Notes), hdc in each ch around, join in beg ch-2. (16 hdc)
Rnd 2: Ch 2, hdc in each hdc around, join in beg ch-2.
Rnds 3–5: Rep rnd 2. At the end of rnd 5, fasten off.
Top Trim
Rnd 6: Join red in first hdc of rnd 5, ch 3(see Pattern Notes), dc in each st around, join in 3rd ch of beg ch-3, turn. (16 hdc)
Rnd 7: Working in back lps(see Stitch Guide) of sts, ch 2, hdc in each st around, join in beg ch-2. Fasten off.
Bottom Trim
Rnd 1: Working in opposite side of foundation ch of rnd 1 of Body, join red, ch 3, dc in each dc around, join in 3rd ch of beg ch3. (16 hdc)
Rnd 2: Working in back lp of sts, ch 2, hdc in each st around, join in beg ch-2. Fasten off.
Hat
Rnd 1: Beg at bottom of Hat, with green, ch 16, join in first ch to form a ring, ch 2, hdc in each ch around, join in beg ch-2. (16 hdc)
Rnds 2–13: Ch 2, hdc in each st around, sk beg ch-2 and join in next hdc to create a dec. At the end of rnd 13, leaving an 8-inch length, fasten off. (4 hdc)
Hat Trim
Rnd 1: Working in opposite side of foundation ch of rnd 1 of Hat, join red, ch 3, dc in each dc around, join in 3rd ch of beg ch3. (16 hdc)
Rnd 2: Working in back lp of sts, ch 2, hdc in each st around, join in beg ch-2. Fasten off.
Assembly
Bend chenille stem in half, insert hot glue in hole of ball knob and insert ends of chenille stem in ball knob to secure.
Fold each Top and Bottom Trims rnd 7 and rnd 2 to RS of Body piece and pull over spool with bottom even with spool and top edge of Top Trim pulled over top of spool. Glue Body to spool where desired. For head, with chenille stem at top of ball knob, glue bottom of ball knob to top of spool.
Using photo as a guide, fold Hat Trim rnd 2 to RS of Hat and pull Hat over chenille stem and down over ball knob. Glue in place leaving only a small area exposed for face. For nose, glue wooden bead to center front of face.
Sew jingle bell to tip of Hat. Bend Hat top downward as desired.
For hanging lp, cut 8-inch length of green and attach to back of Hat.
Santa
Body
Rnds 1–5: With red, rep rnds 1–5 of Elf. (16 hdc)
Top Trim
Rnd 1: Join white bulky in first hdc of rnd 5, ch 3, dc in each st around, join in beg ch 3. Fasten off. (16 hdc)
Bottom Trim
Rnd 1: Working in opposite side of foundation ch of rnd 1 of Body, join white bulky, ch 3, dc in each dc around, join in 3rd ch of beg ch-3. Fasten off. (16 hdc)
Santa Hat
Rnds 1–12: With red, rep rnds 1–12 of Elf Hat.
Rnd 13: Ch 2, hdc in each hdc around, join in beg ch-2. Fasten off.
Hat Trim
Rnd 1: Working in opposite side of foundation ch of rnd 1 of Hat, join white bulky, ch 3, dc in each dc around, join in 3rd ch of beg ch3. (16 hdc)
Assembly
Bend chenille stem in half, insert hot glue in hole of ball knob and insert ends of chenille stem in ball knob to secure.
Pull Body over spool, with bottom even with spool and top edge of Top Trim pulled over top of spool. Glue Body to spool where desired. For head, with chenille stem at top of ball knob, glue bottom of ball knob to top of spool.
Using photo as a guide, pull Hat over chenille stem and down over ball knob; Glue in place leaving only a small area exposed for face. For nose, glue wooden bead to center front of face.
Wrap 1 strand of white bulky 10 times around 2 fingers, remove from fingers and tie in center with 12-inch strand of white. Use scissors to trim ends of pompom as desired. Using tapestry needle and tie ends, sew pompom to Hat tip. Bend Hat top as desired.
Winter Gnome
Body
Rnds 1–5: Rep rnds 1–5 of Elf Body, to create stripes, work rnds 1, 3 and 5 with white and rnds 2 and 4 with blue. (16 hdc)
Top Trim
Rnds 6 & 7: With blue, rep rnds 6 and 7 of Elf Top Trim.
Bottom Trim
Rnd 1: Working in opposite side of foundation ch of rnd 1 of Body, join blue, ch 3, dc in each dc around, join in 3rd ch of beg ch3. (16 hdc)
Rnd 2: Working in back lps of sts, ch 2, hdc in each st around, join in beg ch-2. Fasten off.
Hat
Rnd 1: Beg at bottom of Hat, with blue, ch 16, join in first ch to form a ring, ch 2, hdc in each ch around, join in beg ch-2. (16 hdc)
Rnds 2–13: Rep rnds 2–13 of Elf Hat. (4 hdc)
Hat Trim
Rnd 1: Working in opposite side of foundation ch of rnd 1 of Hat, join white, ch 3, dc in each dc around, join in 3rd ch of beg ch3. (16 hdc)
Rnd 2: Working in back lps of sts, ch 2, hdc in each st around, join in beg ch-2. Fasten off.
Assembly
Bend chenille stem in half, insert hot glue in hole of ball knob and insert ends of chenille stem in ball knob to secure.
Fold each Top and Bottom Trims rnd 7 and rnd 2 to RS of Body piece and pull over spool, with bottom even with spool and top edge of Top Trim pulled over top of spool. Glue Body to spool where desired. For head, with chenille stem at top of ball knob, glue bottom of ball knob to top of spool.
Using photo as a guide, fold Hat Trim rnd 2 to RS of Hat and pull Hat over chenille stem and down over ball knob. Glue in place leaving only a small area exposed for face. For nose, glue wooden bead to center front of face.
Wrap 1 strand of white 20 times around 2 fingers, remove from fingers and tie in center with 12-inch strand of white. Use scissors to trim ends of pompom as desired. Using tapestry needle and tie ends, sew pompom to Hat tip. Bend Hat top as desired.
For hanging lp, cut 8-inch length of blue and attach to back of Hat.
CHAPTER 2Jingle Bell Garland
Design by Katherine Eng
Skill Level
* * EASY
Finished Measurements
1 inch wide × 62 inches long, plus 5½-inch tails
Materials
• Red Heart Super Saver medium (worsted) weight acrylic yarn (7 oz/364 yds/198g per skein):
1 skein #376 burgundy
• 1 spool twisted jute twine: approximately 75 yds
• Size J/10/6mm crochet hook or size needed to obtain gauge
• Size 7/1.65mm steel crochet hook for attaching bells (or any small steel hook)
• Tapestry needle
• 18mm rusty jingle bells #109108 from Factory Direct Craft: 26
Gauge
2 sc and 2 ch-2 sps = 2½ inches; 2 rows = 1 inch
Pattern Notes
Weave in loose ends as work progresses.
Join with slip stitch as indicated unless otherwise stated.
Garland
Row 1 (RS): With jute and leaving 6-inch tail, ch 161, sc in 2nd ch from hook, *ch 2, sk next 2 chs, sc in next ch, rep from * across. Fasten off, leaving a 6-inch tail. (54 sc, 53 ch-2 sps)
Row 2 (RS): With RS facing, join burgundy by drawing up lp in first st, ch 1, sc in same sc as beg ch-1, *ch 2, sk next ch-2 sp, sc in next sc, ch 2, sk next ch-2 sp, sc in next sc, drop lp from hook, using steel hook, pull lp through bell hole, rep from * across, ending with ch 2, sk next ch-2 sp, sc in last sc. Fasten off.
Finishing
Using overhand knot, tie tails tog at end of row 2.
Cut a 12-inch length of jute. Loop through last sc at opposite end of sc and tie in an overhand knot with burgundy tail. Trim tails to 5½ inches.
CHAPTER 3Countdown to Christmas
Design by Lynn Wasylkevych
Skill Level
* EASY
Finished Measurements
Chain Swag: 5/8-inch wide × 77 inches long
Package: 3½ inches wide × 4 inches long, including Bow
Materials
• Medium (worsted) weight acrylic yarn:
235 yds each red, mustard, teal and dark green
• Sizes H/8/5mm and M/N-13/9mm crochet hooks or size needed to obtain gauge
• Tapestry needle
• Stitch marker
Gauge
Size H hook: 8 sc = 2 inches; 8 sc rows = 2 inches
Pattern Notes
Weave in loose ends as work progresses.
Join with slip stitch as indicated unless otherwise stated.
Package and Bow colors in order of placement on Braid:
1. Package teal, Bow mustard.
2. Package red, Bow teal.
3. Package mustard, Bow dark green.
4. Package dark green, Bow red.
5. Package teal, Bow mustard.
6. Package red, Bow dark green.
7. Package mustard, Bow teal.
8. Package dark green, Bow mustard.
9. Package teal, Bow red.
10. Package red, Bow dark green.
11. Package mustard, Bow red.
12. Package dark green, Bow teal.
Tree Ornament colors:
1. Package red, Bow mustard.
2. Package teal, Bow red.
3. Package mustard, Bow teal.
Special Stitch
Bow puff: Ch 3, [yo, insert hook in same st as joining, yo, draw up a lp, yo, draw through 2 lps on hook] twice, yo, draw through all 3 lps on hook, ch 3, sl st in same st as joining.
Package
Make 2 each Package color(see Pattern Notes).
Row 1 (WS): With size H hook, ch 13, working in back bar of ch(see illustration), sc in 2nd ch from hook, sc in each rem ch across, turn. (12 sc)
Rows 2–11: Ch 1, sc in each sc across, turn.
Row 12 (RS): Ch 1, sc in each sc across, leaving a length of yarn, fasten off.
Package Bow
Make 12.
Row 1: Join Bow color to center of row 12 of Package, ch 10, sl st in same st as joining, bow puff(see Special Stitch), ch 10, sl st in same st as joining, [ch 11, sc in 2nd ch from hook, sc in each of next 9 chs] twice, work 12 sc in ch-10 sp, sl st behind bow puff, 12 sc over 2nd ch-10 sp, join in base of bow puff. Fasten off.
Ornament Bow
Make 3.
Row 1: Join Bow color to center of row 12 of Package, ch 10, sl st in same st as joining, ch 12, sl st in same st as joining (hanging lp), bow puff in same st as joining, ch 10, sl st in same st as joining, [ch 11, sc in 2nd ch from hook, sc in each of next 9 chs] twice, work 12 sc in ch-10 sp, sl st behind bow puff, 12 sc over 2nd ch-10 sp, join in base of bow puff. Fasten off.
Braid
With size N hook, holding 1 strand each color tog, leaving 6-inch length at beg, ch 160, leaving 6-inch length. Fasten off.
Finishing
Holding Package pieces WS tog, with tapestry needle, sew invisible seam(see illustration) on 3 sides of Package leaving top edge with Bow unsewn.
Sew Tree Ornaments tog in same manner as Packages. Hang on tree with hanging lp.
First and last Packages are attached 6 inches from beg and end of Braid, sp rem Packages 2 inches apart between Bows. Follow Package and Bow order of placement for position of packages. With matching color, sew 2 sts of top edge of each Bow lp to Braid.
CHAPTER 4Penguin Gift-Card Holder
Design by Amanda Saladin
Skill Level
* * INTERMEDIATE
Finished Measurements
3 inches wide × 6 inches tall
Materials
• Bernat Super Value medium (worsted) weight acrylic yarn (7 oz/426 yds/197g per skein):
1 skein #7421 black
4 yds each #7391 white and #0615 carrot
• Size G/6/4mm crochet hook or size needed to obtain gauge
• Tapestry needle
• Sewing needle
• ¼-inch black hook-and-loop tape
• Black sewing thread
Gauge
4 sc = 1 inch; 4 sc rows = 1 inch
Pattern Notes
Weave in loose ends as work progresses.
Join with slip stitch as indicated unless otherwise stated.
Penguin
First Body
Row 1: Beg at bottom with black, ch 9, sc in 2nd ch from hook, sc in each rem ch across, turn. (8 sc)
Row 2: Ch 1, 2 sc in first sc, sc in each sc across to last sc, 2 sc in last sc, turn. (10 sc)
Row 3: Rep row 2. (12 sc)
Row 4: Ch 1, sc in each sc across, turn.
Rows 5–9: Rep row 4.
Row 10: Ch 1, sc dec(see Stitch Guide) in next 2 sc, sc in each sc across to last 2 sc, sc dec in next 2 sc, turn. (10 sc)
Row 11: Rep row 10. (8 sc)
Rows 12–15: Rep row 4.
Row 16: Rep row 2. (10 sc)
Rows 17–20: Rep row 4.
Rows 21–23: Rep row 10. At end of last row, fasten off. (4 sc at end of last row)
2nd Body
Rows 1–23: Rep rows 1–23 of First Body.
First Wing
Row 1: With RS of First Body facing, join(see Pattern Notes) black in edge of row 15, ch 1, sc in row 15, sc in end of each of next 3 rows (rows 14, 13 and 12), turn. (4 sc)
Rows 2–11: Ch 1, sc in each of next 4 sc, turn.
Row 12: Ch 1, [sc dec in next 2 sc] twice, turn. (2 sc)
Row 13: Ch 1, sc dec in next 2 sc. Fasten off. (1 sc)
2nd Wing
Row 1: With RS of First Body facing, join black in edge of row 12, ch 1, sc in row 12, sc in end of each of next 3 rows (rows 13, 14 and 15), turn.
Rows 2–13: Rep rows 2–13 of First Wing.
Rep First and 2nd Wings on 2nd Body.
Front Pocket
Row 1: With black, ch 9, sc in 2nd ch from hook, sc in each rem ch across, turn. (8 sc)
Row 2: Ch 1, 2 sc in first sc, sc in each sc across to last sc, 2 sc in last sc, turn. (10 sc)
Row 3: Rep row 2. (12 sc)
Rows 4–7: Ch 1, sc in each sc across, turn. At end of row 7, fasten off.
Face
Rnd 1: With white, ch 2, 4 sc in 2nd ch from hook, join in beg sc.
Rnd 2: Ch 1, 2 sc in each sc around, join in beg sc. (8 sc)
Rnd 3: Ch 1, [sc in next sc, 2 sc in next sc] around, join in beg sc. (12 sc)
Rnd 4: Ch 1, [sc in each of next 2 sc, 2 sc in next sc] around, join in beg sc. Fasten off. (16 sc)
Beak
With carrot, ch 3, sc dec in 2nd and 3rd chs. Fasten off.
Sew top edge of Beak to bottom of rnd 1 of Face.
Assembly
Referring to photo for placement, with tapestry needle and black, embroider straight stitch(see illustration) eyes on Face, leaving ¼-inch sp between eyes.
Sew Face centered over rows 16–23 of First Body. Joining matching rows, place Front Pocket on top of First Body. Hold 2nd Body at back of First Body. With RS facing, join black at bottom corner and working through all thicknesses across foundation ch, ch 1, work 8 sc across foundation ch, 9 sc across side of Body to Wing, sc dec in 2 sts at Wing base, 10 sc across underside of Wing, 3 sc at tip of Wing, 10 sc across top of Wing, sc dec in next 2 sts at neck, work 18 sc evenly around head, sc dec in 2 sts at neck, sc 10 across top of Wing, 3 sc at tip of Wing, 10 sc across underside of Wing to Wing base, sc dec in next 2 sc, work 9 sc across side of Body, join in beg sc. Fasten off. (94 sc)
First Foot
Row 1: With RS facing, working on 8 sc across joining of bottom, join carrot in first sc, ch 1, sc in same sc as beg ch-1, sc in next sc, turn. (2 sc)
Row 2: Ch 1, 2 sc in each of next 2 sc. Fasten off. (4 sc)
2nd Foot
Row 1: With RS facing, sk next 4 sc of joining of bottom, join carrot in next sc, ch 1, sc in same sc as beg ch-1, sc in next sc, turn. (2 sc)
Row 2: Ch 1, 2 sc in each of next 2 sc. Fasten off. (4 sc)
Finishing
Cross Wings in front of Body to hold gift card. Secure hook-and-loop tape to row 13 of each Wing. With sewing needle and black thread, secure hook-and-loop tape in place.
CHAPTER 5Santa's Got a Secret!
Design by Debra Arch
Skill Level
* EASY
Finished Measurements
4 inches wide × 10½ inches long, excluding Pompom
Materials
• Red Heart Super Saver medium (worsted) weight acrylic yarn (7 oz/364 yds/198g per skein):
35 yds #319 cherry red
15 yds #311 white
10 yds #313 Aran
• Red Heart Classic medium (worsted) weight acrylic yarn (3½ oz/190 yds/100g per skein):
5 yds #246 sea coral
• Size F/5/3.75mm crochet hook or size needed to obtain gauge
• Tapestry needle
• 6mm half-round black cabochons: 2
• 5/8-inch #1090-04 gold jingle bell by Darice
• White chenille stem
• Pink cosmetic blush
• Cotton swab
• Craft glue
• Clips or pins
Gauge
4 sc = 1 inch; 4 rows = 1 inch
Pattern Notes
Weave in loose ends as work progresses.
Join with slip stitch as indicated unless otherwise stated.
(Continues…)
Excerpted from "'Tis The Season Christmas Crochet"
by .
Copyright © 2019 Annie's.
Excerpted by permission of Annie's.
All rights reserved. No part of this excerpt may be reproduced or reprinted without permission in writing from the publisher.
Excerpts are provided by Dial-A-Book Inc. solely for the personal use of visitors to this web site.
Table of Contents
Pattern Services and Revisions,
Templates,
I'll Be Gnome for Christmas,
Jingle Bell Garland,
Countdown to Christmas,
Penguin Gift-Card Holder,
Santa's Got a Secret,
Snow Folk,
Winter Woods Angel,
Evergreen Trees,
Snowflake Gift Bag,
Winter Fun Blanket,
Happy Snowman,
Christmas Tree Pillow,
Beaded Treetop Angel,
Santa Pillow,
Sparkling Ornament Afghan,
Christmas Mice,
Bright Stripes Ornaments,
Merry Chris Moose Ornament,
Jolly Snowman,
Jingling Bells Ornament,
Towel Topper,
Holiday Wreath,
Gingerbread Kids,
Stitch Guide,
Metric Conversion Charts,