

Sew With Me: 60 Fun & Easy Projects to Make Your Own Fabulous Decor and Accessories
192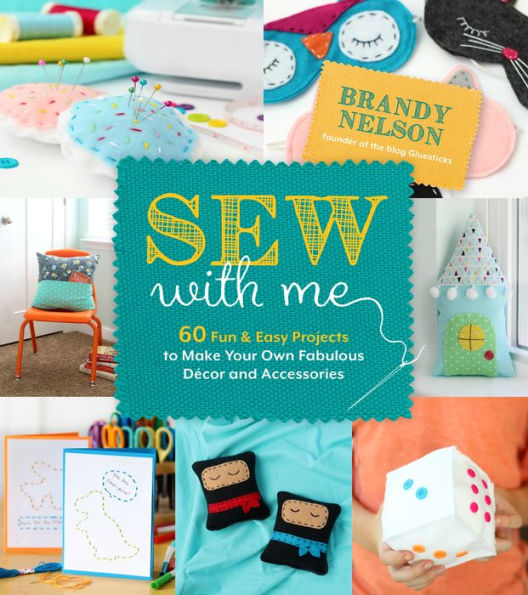
Sew With Me: 60 Fun & Easy Projects to Make Your Own Fabulous Decor and Accessories
192Paperback
-
PICK UP IN STORECheck Availability at Nearby Stores
Available within 2 business hours
Related collections and offers
Overview
Make every day a crafting bonanza with this inspiring and helpful guidebook packed with 60 projects. These accessories, toys and decorations are as easy to create as they are fun to wear and display! Grab an adult to help you get started, then you’re off sewing adorable crafts you can personalize with your favorite colors and fabrics.
Make cool stuff with your friends, such as hair and fashion accessories, and decorate your room your way with personalized pillows and throws. Become the most stylish kid at school with a homemade notebook cover and a pencil pouch. There are so many projects to choose from, such as:
· Watermelon Tote
· Happy Face Coasters
· Animal Sleep Masks
· Pom-Pom Throw
· Unicorn Mane Scarf
· and so much more!
Easy-to-follow instructions make this book a great place to start for beginners. With the projects divided into three skill levels, it’s a cinch to find one that’s just right for you. Beginner projects use only hand stitching, intermediate ones combine hand stitching with easy machine sewing and advanced ones use only a machine. Filled with pictures, friendly advice and cutout templates, this will become your favorite activity book for playtime.

Product Details
| ISBN-13: | 9781624146312 |
|---|---|
| Publisher: | Page Street Publishing |
| Publication date: | 12/11/2018 |
| Pages: | 192 |
| Product dimensions: | 7.90(w) x 8.90(h) x 0.80(d) |
| Age Range: | 7 - 12 Years |
About the Author
Read an Excerpt
CHAPTER 1
CREATIVE KNICKKNACKS IN A STITCH
From a Travel Sewing Kit to a Hand Towel Travel Caddy, this chapter is brimming with creative projects that are fun to make and are useful too! If you are brand-new to sewing, try making a Sugar Cookie Pincushion. You'll create a place to hold your pins for future projects, and you'll also develop your cutting, pinning and hand sewing skills!
SUGAR COOKIE PINCUSHION
Now that you're learning to sew, you'll need a place to keep all of your pins. Make a sugar cookie pincushion — with your favorite flavor of frosting and colorful sprinkles!
sewing level: 1
Pincushion templates Scissors
1 (10 x 5-inch [25 x 13-cm]) piece of felt for the cookie
1 (4 x 4-inch [10 x 10-cm]) square of felt for the frosting Embroidery thread in a variety of colors (6 strands)
Needle Small handful of pillow stuffing Pins
1. Using the cutting templates, create your patterns. Use the patterns to cut out 2 cookie shapes and 1 frosting shape out of felt.
2. Cut a length of embroidery thread, and tie a knot at one end. Thread the other end through a needle. Hand stitch the frosting piece to 1 of the cookie pieces using a running stitch. Tie a knot in the back and trim the thread. (Photo A)
3. Now for the fun part: sprinkles! Choose a few of your favorite colors of embroidery thread. For this part of the project, you are going to use all 6 strands of embroidery thread from each length. The thread will be thicker, and you may want to use a needle with a bigger eye or ask an adult to help you thread the needle. Cut long lengths and thread your needle. Stitch sprinkles all over in random places, only tying a knot when you change thread colors.
The back of your project will look like a mess, but that's okay! You are going to cover that up anyway with the other piece of felt. Just keep stitching until your cookie is nice and colorful. (Photo B)
4. Stitch the second cookie piece to your top cookie and frosting piece using a running stitch and matching thread. Leave a small opening to fill your cookie with the stuffing. (Photo C)
5. Add a small amount of the stuffing, and stitch the opening shut. Tie a knot and trim the thread. (Photo D)
6. Add the pins and you are done!
TRAVEL SEWING KIT
You never know when you might need to make a small sewing repair. Or maybe you want to work on a sewing project while you are traveling! This tiny sewing kit is perfect for bringing with you. It holds scissors, needles, pins, a safety pin and thread.
sewing level: 1
Bird templates Scissors Felt scraps for the bird, beak and heart
2 (7 x 10-inch [18 x 25-cm]) rectangles of felt Pins Embroidery thread (3 strands)
Needle
1 (2½ x 2-inch [6 x 5-cm]) rectangle of felt for small pocket
1 (1 x 6-inch [2.5 x 15-cm]) rectangle of felt for the needle holder
1 (4 x 4-inch [10 x 10-cm]) square of felt for big pocket
1 (10-inch [25-cm]) piece of embroidery thread (6 strands)
2 (10-inch [25-cm]) pieces of ½-inch (13-mm)-wide ribbon
1. Using the cutting templates, create your patterns. Cut out 1 bird, 1 beak and 1 heart for the wing.
2. Fold 1 of the large (7 x 10-inch [18 x 25-cm]) rectangles of felt in half. Place the bird in the center and pin it in place. Open the rectangle so that it lays flat. Tuck the beak under the bird about ¼ inch (6 mm).
3. Cut a long length of embroidery thread, and tie a knot at one end. Thread the other end through a needle. Use a running stitch to stitch around the edge of the bird. Stitch an X for an eye. Stitch the wing onto the center of the bird. Tie a knot on the back, and cut the thread. (Photo A)
4. Change the thread colors, if desired. Use a backstitch to stitch 2 long vertical legs and 2 short horizontal feet. Tie a knot on the back, and cut the thread. Set this rectangle aside.
5. Place the other large rectangle on your work surface. Line up the small pocket ½ inch (13 mm) from the bottom and ½ inch (13 mm) from the left-side edge. Lay the skinny strip of felt next to it, centering it in between the top and bottom edges. Pin it in place. Pin the large pocket to the other side, ½ inch (13 mm) from the bottom and ½ inch (13 mm) from the right-side edge. (Photo B)
6. Thread your needle with the 10-inch (25-cm) piece of embroidery thread. Tie a knot at one end. Push the needle into the felt ½ inch (13 mm) above the small pocket and make a large stitch on the back of the felt, bringing the needle out to the front again. Remove the needle, and tie a knot in the other end of the embroidery thread. (Photo B)
7. Cut a length of embroidery thread, and tie a knot at one end. Thread the other end through a needle. Use a running stitch to stitch around the sides and bottom of each pocket and the top and bottom of the skinny strip. Tie a knot on the back, and cut the thread of each pocket and felt piece before moving on to the next. (Photo B)
8. Place the felt piece with the bird on the work surface with the bird facing the table. Lay 1 piece of 10-inch (25-cm) ribbon on the center of each side, overlapping the edge by ½ inch (13 mm). Lay the other rectangle on top with the pockets facing you. Place a pin on each ribbon, and a few more around the edges to keep everything in place.
9. Cut a long length of embroidery thread (34 inches [86 cm]), and tie a knot at one end. Thread the other end through a needle. Use a running stitch to stitch around the entire edge to attach the 2 rectangles. Tie a knot on the back, and cut the thread. (Photo C)
E-READER COVER
Make a cover for your e-reader device to keep it protected while you are on the go! This cover will fit a standard 4½ x 7½-inch (11 x 19-cm) e-reader.
sewing level: 3
1 (6½ x 18-inch [16.5 x 46-cm]) rectangle of cotton fabric for main fabric
1 (6½ x 18-inch [16.5 x 46-cm]) rectangle of cotton fabric for lining
1 (4-inch [10-cm]) piece of 1/8-inch (3-mm)-wide elastic braid Pins Sewing machine Coordinating thread Scissors Iron Ironing board Pencil or sewing pen
1 (¾-inch [19-mm]) button Embroidery thread Needle
1. Lay the rectangles of fabric on your work surface with the right sides of the fabric facing each other and all of the edges matched up. Fold the piece of elastic in half. Pin it to the center of the bottom piece of fabric. (Photo A)
2. Pin around the sides and top of the rectangles, leaving the bottom open. Sew around the sides and top, using the pressure foot as a guide. Trim the top corners on a diagonal, being careful not to cut the stitches. This will create nice corners when you turn your e-reader cover right-side out. (Photo B)
3. Turn the cover right-side out. Ask an adult to help you iron the seams flat. Fold the open ends over about ¼inch (6 mm) and iron flat. Add a couple of pins to keep the opening closed. Sew the bottom opening closed using a ¼-inch (6mm) seam allowance. Trim the threads. (Photo C)
4. With the elastic loop on top and the lining fabric facing you, fold the bottom edge up 6½ inches (16.5 cm). Measure 4 inches (10 cm) from the bottom, and make a mark in the center of the fabric with a pencil or sewing pen.
5. Center a button on the fabric with the button holes covering the pencil/sewing pen mark. Open the fold of the fabric, and hand stitch the button into place with matching embroidery thread.
6. Fold the bottom edge up 6½ inches (16.5 cm) once again. Pin the sides to keep them in place. Sew around the entire rectangle using a ¼-inch (6-mm) seam allowance. This will close the sides, creating a pocket, and it adds a nice finished edge to the e-reader cover! (Photo D)
7. Slide your e-reader into the pocket, and close it with the button and loop.
NOTE
You can adjust the measurements to make a cover for any device. Here's a good rule of thumb to go by: Measure the width and length of your e-reader. Multiply the width by 1.5 and the length by 2.5 for the dimensions to cut your rectangles. Adjust the bottom fold and button placement as necessary.
STUFFED ANIMAL SLEEPING BAG
Do you have a favorite stuffed animal? Maybe it's a teddy bear that you've had since you were a baby or one that you stuffed yourself at the mall. Make a cozy sleeping bag for your special friend for sleepovers and campouts!
sewing level: 3
1 (11 x 14-inch [28 x 36-cm]) rectangle of fleece Measuring tape Pins Sewing machine Thread
2 (11 x 20-inch [28 x 51-cm]) rectangles of fleece Scissors
1. Using the measuring tape as a guide, fold the top edge of the 11 x 14inch (28 x 36-cm) rectangle toward the backside of the fleece 1 inch (2.5 cm). Add a few pins to keep it in place. (Photo A)
2. Set your sewing machine to a zigzag stitch. A zigzag stitch goes back and forth instead of in a straight line. Sew across the top, using a 5/8-inch (16-mm) seam allowance.
3. Lay 1 of the 11 x 20-inch (28 x 51-cm) rectangles of fleece on your work surface with the right side of the fabric facing you. Place the smaller rectangle with the folded edge on top with the right side of the fabric facing you. Line up the bottom edges. Place the other 11 x 20-inch (28 x 51-cm) rectangle on top with the right side of the fabric facing down. (Photo B)
4. Pin along the sides and the top to sandwich the smaller rectangle of fleece in between the other 2 layers. (Photo C)
5. Zigzag stitch around the sides and top, using the pressure foot on your sewing machine as a guide. Do not sew the bottom edge. Trim the top corners on a diagonal, being careful not to cut your sewing stitches. This will create nice corners when you turn the sleeping bag right-side out.
6. Turn the sleeping bag right-side out, but here's the catch! You want the smaller piece of fleece to have the wrong side of the fabric facing you. This may not seem right, but it is! (Photo D)
7. Pin the bottom edge closed, and zigzag stitch it closed using the pressure foot on your sewing machine as a guide. Trim the threads. As you look at your sleeping bag, you are going to think that you did something wrong. The bottom edge will be raw and the back side of the stitching on the smaller rectangle is facing you. Don't worry! It's right and you are doing exactly what you need to be doing.
8. For the last step, flip the sleeping bag inside out one more time. As you do this, everything will come together, and your sleeping bag will be ready for keeping your special friend cozy.
NOTE
This stuffed animal sleeping bag will fit your favorite 15- to 16-inch (38- to 41- cm) stuffed animal perfectly.
HAPPY FACE COASTERS
Make a set of happy face coasters to brighten your day! Use these fun coasters to protect surfaces from drips that a glass of water or a cup of hot chocolate might leave behind.
sewing level: 2
makes 1 coaster, with 2 variations
2 (4-inch [10-cm]) circles of felt Felt scraps for details Coaster templates Scissors Pencil or sewing pen Embroidery thread Needle Pins Sewing machine Thread
1. You can use a compass, mug or a small bowl to create the 4-inch (10-cm) circles for your coasters.
2. Decide what details you'd like to use: sunglasses, hearts or a tongue. Using the cutting template, create your patterns and then cut them out.
3. Use a pencil or sewing pen to lightly draw a mouth onto one of the circles. This will make it easier to keep everything straight and centered when you sew on these details.
4. Cut a length of embroidery thread, and tie a knot at one end. Thread the needle. Stitch the mouth onto the front of your coaster using a backstitch. If you are making the coaster with stitched eyes, backstitch those to the front of the coaster as well. Tie a knot on the back and trim the thread. (Photo A)
5. Switch thread colors, if necessary, and use a running stitch to sew around the sunglasses, tongue or hearts. Tie a knot on the back and trim the thread.
6. This circle will be the top of your coaster. Pin this circle to another circle that will be the bottom of your coaster. (Photo B)
7. Using a sewing machine, stitch close to the edge of the circle with either a 1/8- or ¼-inch (3- or 6-mm) seam allowance. Go slowly around the turns. Trim the threads. (Photo C)
NOTE
You can also glue a magnet onto the back of the happy faces and use them to decorate your refrigerator!
TIC-TAC-TOE (TRAVEL EDITION)
If you've ever been bored on a road trip, this game is for you! There is a pocket on the back to store all of the pieces — perfect for traveling.
sewing level: 2
1 (4¼ x 4½-inch [11 x 11-cm]) square of felt in a contrasting color
1 (5½ x 5½-inch [14 x 14-cm]) square of felt Pins Needle Embroidery thread Scissors
1 (5½ x 4¼-inch [14 x 11-cm]) rectangle of felt Sewing machine Thread
1 (5½ x 2¼-inch [14 x 6-cm]) rectangle of felt
3 adhesive Velcro dots
10 buttons
1. Center the small square of felt onto the large 5½ x 5½-inch (14 x 14cm) square. Place 2 pins in the center to keep everything in place. Thread a needle with a long piece of embroidery thread. Tie a knot at the end. Using a running stitch, stitch around all 4 sides of the small square. Tie a knot in the thread and cut the thread. (Photo A)
2. Now we are going to create the 9 squares to play tic-tac-toe. Place 2 pins on the top of the square and 2 on the bottom. These will be your sewing guides. Stitch from the top pin to the bottom pin, and use these pins to guide you while you're sewing. If they aren't completely straight, that's okay! Repeat for the other side. (Photo B)
3. After you've sewn 2 lines, turn your square 1 turn to the right. Place 2 pins on the top and 2 pins on the bottom, and stitch 2 more lines. You have now sewn 4 lines and created 9 squares. Tie a knot in the thread and cut. (Photo C)
4. Match the 5½ x 4¼-inch (14 x 11-cm) rectangle to the bottom and side edges on the back of your large square of felt. Place a few pins into the felt to keep everything in place.
5. Machine stitch along the sides and bottom of the square of felt using a ¼-inch (6-mm) seam allowance. When you get to a corner, make sure that the needle is down in the fabric before you lift the pressure foot to turn the fabric. After you turn the fabric, lower the pressure foot again and continue sewing. Trim the threads. (Photo D)
6. Match the edges of the skinny rectangle to the top edge on the back of your large square of felt. Place a few pins into the felt to keep everything in place. (Photo E)
7. Machine stitch across the top of the felt using a ¼-inch (6-mm) seam allowance. Cut the threads.
8. You have now created a pocket with a flap to store your tic-tac-toe pieces. To keep it closed while you travel, add a few adhesive Velcro dots to the back of the flap and on the top edge of the rectangle. Close the flap and press firmly on the Velcro dots for 10 seconds. (Photo F)
9. Fill the pocket with 10 buttons (5 each of two colors).
MONSTER PUPPET
This puppet pattern can be used to create ANY kind of puppet, but everyone loves friendly monsters, so let's make one today! Use the templates as a guide, but get creative and feel free to mix things up to create your one-of-a-kind monster puppet.
sewing level: 2
Puppet templates (here and here)
Scissors
2 (8½ x 11-inch [22 x 28-cm]) sheets of felt for the puppet Felt scraps in a variety of colors for the puppet details Needle Embroidery thread Pins Sewing machine Thread
1. Using the cutting templates, create your patterns. Cut 2 puppet pieces and as many accessory pieces as you'd like. Or design your own! (Photo A)
2. Thread a needle with a length of embroidery thread, and tie a knot at the end.
3. Hand stitch the eyes, nose, mouth, fangs and belly onto the front of your monster using a running stitch. Use pins to keep the pieces in place while you stitch. Change out your thread color as needed. Use white thread to stitch a large X on the smaller eyeball. (Photo B)
4. Place the back puppet-piece on your work surface. Lay the front puppet-piece on top and line up the edges. Pin around the sides.
If you'd like to add horns or spikes, tuck them in between the 2 puppet pieces. Pin them in place. (Photo C)
5. Machine stitch around the sides and top, leaving the bottom open. Use a ¼-inch (6-mm) seam allowance. Take your time and go slowly around the curves. Adjust the position of the fabric when going around a sharp curve by keeping the needle in the fabric and raising the pressure foot. Pivot the fabric to its new position, lower the pressure foot and continue sewing. Trim the threads.
(Continues…)
Excerpted from "Sew with me"
by .
Copyright © 2018 Brandy Nelson.
Excerpted by permission of Page Street Publishing Co..
All rights reserved. No part of this excerpt may be reproduced or reprinted without permission in writing from the publisher.
Excerpts are provided by Dial-A-Book Inc. solely for the personal use of visitors to this web site.
Table of Contents
Title Page,
Copyright Notice,
Dedication,
introduction,
chapter 1 CREATIVE KNICKKNACKS IN A STITCH,
chapter 2 OH SEW EASY ROOM DÉCOR,
chapter 3 SEW–PHISTICATED GIFTS TO MAKE,
chapter 4 CUTE AS A BUTTON ACCESSORIES,
chapter 5 HOLIDAY CRAFTS IN A SNAP,
chapter 6 PIN–TASTIC PROJECTS FOR YOUR BACKPACK,
Project Templates,
Acknowledgments,
Index,
About the Author,
Copyright,