
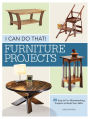

I Can Do That - Furniture Projects: 20 Easy & Fun Woodworking Projects to Build Your Skills
128
I Can Do That - Furniture Projects: 20 Easy & Fun Woodworking Projects to Build Your Skills
128Paperback
-
PICK UP IN STORECheck Availability at Nearby Stores
Available within 2 business hours
Related collections and offers
Overview
This book is comprised of 20 furniture projects based on the popular I Can Do That method presented in Popular Woodworking's ICDT video series hosted by Chad Stanton. These projects look good, are well made, yet at the same time achievable for even a beginner with an inexpensive (but decent) set of tools. You'll find clear instructions with complete step-by-step photos, illustrations and cutting lists to help you every step of the way.

Product Details
| ISBN-13: | 9781440351235 |
|---|---|
| Publisher: | Penguin Publishing Group |
| Publication date: | 10/16/2018 |
| Pages: | 128 |
| Sales rank: | 365,971 |
| Product dimensions: | 8.20(w) x 10.80(h) x 0.40(d) |
Read an Excerpt
CHAPTER 1
PROJECT 1
Curved Legged Coffee Table
The living room is a great place for friends or family to gather for any social occasion. It's a place to relax, unwind and have a drink or two. Of course, you'll need someplace to set that drink. This coffee table has plenty of space for setting things on top, and it also has a drawer on the front to store coasters, remote controls or anything else you wish to keep out of sight. It's not only functional, it's quite attractive. The curved legs and the two-tone stain give this table a graceful look, making it a perfect centerpiece for the living room.
Since this is a larger project, construction from solid wood can be costly, so I've designed it so you can make most of it from a single sheet of plywood. Perfect for limiting the strain on the wallet. But it's not all plywood – the curved legs are solid wood.
Begin this coffee table by making the plywood top. From the cut list, measure over from the edge of the plywood and make a pencil line. Use a straight-line jig for the circular saw and make a cut going with grain. The jig has a fence to guide the saw, and because the fence is perfectly in line with the blade it can be placed right on the line for an accurate cut (Photo 1).
Use sacrificial boards underneath the plywood. Make sure to have the boards running perpendicular to the cut. This practice keeps the plywood from falling in on itself and pinching or binding the blade when making the cut. When using the circular saw, place the good side of the plywood face-down. Crosscutting plywood produces some tear-out on the top surface, leaving a very rough and jagged edge. To help eliminate this make a shallow cut first into the plywood. This is called a scoring cut.
Set the blade so it cuts no more than 1/8" into the plywood and make the scoring cut (Photo 2).
Then, without moving the jig, adjust the blade depth to make the full cut.
With the top cut to size, repeat the same procedure for cutting out the lower shelf.
Although the veneer faces of the plywood tabletop and lower shelf look fine, the rough plywood edges stick out like a sore thumb. Use edge banding to cover up the layers of plywood. Edge banding is a thin strip of veneer available in various wood species – in this case I've chosen banding in oak to match the oak plywood – and has a heat-activated adhesive on the back, which can be applied using a common household iron.
When applying edge banding, common sense would say to cut the banding the same length as the edge being covered. However, as the glue begins to melt the edge band has a the tendency to slide. If the banding is the exact length, it might move from the original position and expose the plywood layers that I wanted to cover up. To avoid this, leave banding a little long and cut off the ends with a razor or knife after the glue sets.
The glue sets fairly quickly once the heat is removed. Still, it's not a bad idea, while the edge banding is still warm, to use a scrap piece of wood to rub back and forth on the banding with some pressure to help make sure the banding is firmly applied.
Use a razor blade to cut off the long ends. Edge banding is typically a bit wider than the plywood, so you'll need to trim this flush, too. There is a tool that fits over the plywood and it is squeezed together tightly around both sides of the banding. It has two blades in it and while squeezing, push the tool to cut the excess waste off the banding. However, some tear out can occur while using this tool. Edge banding is real wood, and just like real wood going against the grain can produce tear-out. So while one side of the tool is cutting with the grain, the other side is going against the grain. TIP – Separate the tool into two halves and trim each side individually, making sure to go with the grain(Photo 3).
Once the top is done, set it aside and begin work on the table aprons. The aprons are plywood trimmed down to 2½" with a circular saw guided by a straightedge or auxiliary fence. Crosscut the aprons to length on the miter saw. Lay the apron pieces out according to the plans and mark where the pocket holes will go. Pocket screws will attach the aprons together as well as fasten the top (Photo 4).
Glue and screw the apron assembly together and set the assembly aside.
The legs are made from 1x8 solid oak, and each has a slight curve. Make a template from the plans, then use a pencil to trace the pattern onto each of the leg workpieces. Notice that the template goes from one corner to the other of the 1x 8 (Photo 5).
Cut out the legs with a jigsaw and clean up any rough edges with a file or sandpaper.
It's time for some assembly. From the plans, measure up and mark where the lower shelf will be positioned and use pocket screws to attach the legs to the shelf (Photo 6).
After all four legs are attached to the shelf, turn the table upside down and place the apron assembly inside of the legs. This keeps the top of the legs flush with the top of the apron assembly. Measure an equal distance from side to side to get the apron assembly centered in the legs. Clamp the aprons to the legs to hold it in place, then drill clearance holes through the back side of the aprons. Finally, screw the apron assembly to the back side of the legs.
It might be tempting to attach the top, but the drawer is next. And with the top off, it will be easier to get the measurements needed for the drawer.
Measurements for the drawer size can be found in the plans, however it's best to measure the inside of the drawer opening in the apron to get an exact measurement. Keep in mind, this drawer uses glides, which will make opening it easier. The two most common types of glides are the ¾" extension (right) and the full extension (left) TIP – most drawer glides require ½" clearance, so a good rule of thumb is to make the drawer 1" smaller than the opening(Photo 7).
The drawer is made out of ½" x 3½" poplar cut down to the correct height. The drawer construction is simple on these, with the sides glued and nailed using butt joints. The bottom is ¼" plywood cut to the size of the drawer frame and, again, glued and nailed to the bottom of the drawer frame (Photo 8).
Using the ¾" extension glides, mount one part of the glide to the drawer bottom and keep it flush with the front of the drawer. On the table, mount the second half of the glide ¾" back from the front edge – this will account for the thickness of the drawer front.
With the drawer mounted in the table, the drawer front is next. The drawer front is some of the ¾" plywood cut slightly smaller than the apron opening. Making the drawer front a bit smaller than the opening ensures that it won't rub on the underside of the tabletop or sides of the apron opening once installed. Likewise, shaving just a bit off the drawer front dimensions allows you to add edge banding around the edges to hide the raw plywood if you like. Keep the drawer front flush with the bottom edge of the apron (Photo 9).
Use spring clamps to hold the drawer front in place. From inside the drawer, drill clearance holes through the front and into the back surface of the drawer front, then secure the drawer front with screws (Photo 10).
Test that the drawer opens and closes smoothly.
Place the tabletop top-side down on your bench, then flip the table upside down on the underside of the tabletop. Center the table on the top and place pocket screws in one back corner. Check the front of drawer. It should be flush to the apron with even gaps. If not, slightly pull or push the front legs until alignment is corrected. Then finish driving screws all around the apron.
Return the table to its upright position, then sand and finish as desired. However, the veneer is very thin so be careful not to sand too deeply into the plywood. (A link to the ICDT common rules manual is located at the end of the book).
I did this project with a two-toned stain color – natural for the top, lower shelf, apron and drawer, and a dark walnut for the legs. If you choose to do this, carefully mask off where the two colors will intersect to prevent bleeding into other area.
This table has three coats of oil-based polyurethane finish to offer better protection from hot and cold items placed on the surface.
Your finished table will be perfect for holding coffee cups, TV remotes or books – I'd also be willing to bet it will hold the interest of all who see it.
CHAPTER 2PROJECT 2
Puzzle Leg Coffee Table
As a kid, I remember wooden puzzles that always seemed to have some kind of trick that defied the laws of nature. Just for fun I decided to make one that gives the impression that the three pieces of wood have pierced through each other. Then I thought to myself, "Hey, that could make a cool coffee table." And so with a few 2x6s and some plywood the process of building one began.
This project isn't overly complicated, but it does require accurate measuring and cutting. Each of the three pieces is the same length and width. The width of the pieces has to be three times the thickness of each piece. There are notches cut into them (Photo 1 sample), and then the secret of the assembly order is key to putting it all together.
The top of this coffee table is comprised of two pieces of ¾" plywood glued and screwed together. I really liked the look of the plywood grain but it was a little busy. Routing a few grooves in the surface softened the effect of the grain and gives the impression of several boards planked together.
The legs are cut to length from 2x6 dimensional lumber. Crosscut the legs to 36" in length on the miter saw. As noted, the width of each leg is three times its thickness. A standard 2x6 is actually 1½"-thick so the width of each board is 4½". You'll have to rip the boards down to get that width. Also 2x6s have slightly rounded over corners that have to be squared before they'll fit into the notches without gaps.
If you have access to a table saw, squaring those edges and ripping the boards to the proper width is easy. However, you can still accomplish this with a circular saw and an auxiliary saw guide attached to rip it to width. Cut equal amounts off each edge to get the 4½" width (Photo 2), and that will automatically square the edges as well. These cuts have to be precise, so rip the board just a little wider, then use a handplane to sneak up on the exact size.
Now, let's get those boards ready for some notching. Lay the three legs out so the ends are flush with each other. Find the middle of the boards and draw a line across them (Photo 3). Then measure 2¼" over on both sides of that line, making new lines (Photo 4). This is the width of the board.
Transfer these three lines all the way around to the other side of each board.
Use a combination square and set it to the thickness of the board. Run the combination square down each side of the board and draw a line. This will define the width of the notch you'll cut (Photo 5).
Two of the three legs will be notched almost the exact same way. However the third one is different so set it aside and begin with the first two (Photo 6).
Use a Forstner bit to remove the majority of the waste to form your notch. Find the center of the board so the point of the bit can be placed on the line (Photo 7).
Drill the two ends of the notch first and then the middle. When using a drill it's easy to bore a hole off at a slight angle. To help prevent this, drill about halfway and then flip the board over to repeat the process. This helps assure straight, square holes. (Make sure you have a sacrificial board underneath to protect the benchtop).
With the holes drilled, square up the notch with a ¾" chisel. Begin working the chisel with the grain of the board. Slowly work to the pencil line, but don't go beyond it. Also, just like when drilling, chisel about half way and then turn the board over (Photo 8).
TIP – Working the chisel at a slight angle produces a slicing effect versus a chopping effect, making it easier to work.
To square up the corners, strike the chisel with a mallet, going across the grain, then strike the chisel going with the grain (Photo 9). Remove a little at time until reaching the middle and again flip the board over for the other side. TIP – When striking a chisel with a mallet, place the workpiece on the bench directly over the leg of the bench. This is the sturdiest part of the bench and will reduce any bounce giving a better, deep cut.
After using the chisel, test-fit the notch with a scrap piece of the leg (Photo 10). It should be snug with no gaps. If the notch is too small, use a rasp and adjust the fit to where the piece goes in but is not loose. If the fit is really tight, do not strike with a mallet to get the piece to fit. This could result in splitting the leg.
After a nice fit is achieved on the first leg, drill and mortise the notch out the same way for the second leg. Although the notch in this leg is the same as in the first, this one gets a secondary notch perpendicular to it. The crosscut section to be removed matches the thickness of the leg at 1½". Measure and draw the line and cut it out with a hand saw (Photo 11). Make sure to cut on the waste side of the line. Once again, if the test piece is too tight, trim the notch with a rasp or sanding block.
The third and last leg is drilled and cut out in the same manner as the other two, but pay attention to the size and shape of the material being removed. From the plans, lay out the lines and remove the waste.
With all three legs notched out, it's time for a test fit. Just like my original small puzzle pieces (Photo 12), fitting the legs together requires that it be done in a specific order. It helps to number the pieces to keep from getting confused.
Place leg number 1 vertical in the vise and slide number 2 into it (Photo 13).
Slide number 2 to the edge of the notch keeping it flush with the face on leg number 1. Make sure the notch on leg 2 is facing toward you and not away from you (Photo 14).
Leg number 3 slides down from the top of leg number 1. Again note the direction of the notch cut out. It's facing away from me (Photo 15).
Leg 3 has to fit over and into leg number 2. This will be a snug fit, but do not strike it with a mallet or it will break (Photo 16).
Once number 3 is in place, finish the fit by pushing leg number 2 deeper into number 1 (Photo 17). Now the test-fit is a success!
With the legs setting on top of the workbench, cut the bottoms so they sit flat. Use a compass and set it to the highest corner of the leg (Photo 18).
Then trace a pencil line all the way around the leg. Do this for each leg, then turn the unit over, and again trace around each leg. The tops are also cut flat for the top to be attached.
Disassemble the leg unit to cut each of the individual legs. You can use a miter saw for this cut, however it has to be a compound miter saw that not only pivots in the front, but has to be able to tilt both directions in the back. If a compound miter saw isn't available, do the crosscutting by hand with a handsaw (Photo 19).
When using the handsaw, begin by sawing down the line a little in the back, then tilt the saw forward to cut the line on the top. Repeat this procedure. Work slowly and pay attention to the lines. Once the blade is about one third into the wood it won't be possible to correct the angle of the saw (Photo 20).
Reassemble the leg unit and then drill some clearance holes on the tops of the legs. This will allow you to drive screws up and through the legs to attach the top (Photo 21).
The table top is a double layer of ¾" plywood cut into 3' squares, with line drawn on the upper piece at 6" spacing. We'll rout along these lines to give the top a simulated planking effect (Photo 22). To make these V-shaped grooves we'll use what's called a "veining bit" with a triangular tip (Photo 23).
Go ahead and chuck the bit up in your router so that just the triangular tip extends past the router's base plate.
To make sure our router cuts are straight, clamp a straightedge onto the plywood to guide the router. To accurately locate the straightedge, take a compass and adjust it so the points extend from the edge of the router base to the center of the router bit (Photo 24).
(Continues…)
Excerpted from "I Can Do That! Furniture Projects"
by .
Copyright © 2018 Chad Stanton.
Excerpted by permission of F+W Media, Inc..
All rights reserved. No part of this excerpt may be reproduced or reprinted without permission in writing from the publisher.
Excerpts are provided by Dial-A-Book Inc. solely for the personal use of visitors to this web site.
Table of Contents
TABLES,
1 Curved Leg Coffee Table, 6,
2 Puzzle Leg Coffee Table, 10,
3 Console Table, 17,
4 Pagoda End Table, 22,
5 Table for Two, 28,
6 Picnic Table, 34,
SEATING,
7 Hallway Bench, 40,
8 Pine Bench, 45,
9 Chair Steps, 51,
10 Rocking Chair, 59,
STORAGE,
11 Tool Chest, 68,
12 Modern Chest on Stand, 72,
13 Drop-Front Desk, 78,
14 Stackable Storage, 86,
15 Fireplace Bookcase, 91,
FUN STUFF,
16 Shaker Wall Box, 97,
17 Oak Hall Mirror, 101,
18 Shoji Screen, 108,
19 Backyard Bar, 113,
20 Potting Bench, 121,
Related Subjects
Customer Reviews
Explore More Items


