Read an Excerpt
Ready the Cannons!
Build Wiffle Ball Launchers, Beverage Bottle Bazookas, Hydro Swivel Guns, and Other Artisanal Artillery
By William Gurstelle Chicago Review Press Incorporated
Copyright © 2017 William Gurstelle
All rights reserved.
ISBN: 978-1-61373-445-2
CHAPTER 1
THE BEVERAGE BOTTLE BAZOOKA
The Beverage Bottle Bazooka is an easy-to-complete project and it's a real thrill to use. As you build it, you will combine a tad of physics with a smidgen of chemistry to make something quite wonderful. And there's a bit of ecology in there as well because the project uses some recycled materials such as cardboard tubes and empty plastic beverage containers. (It's a good way to repurpose and recycle stuff around your house as well.)
HOW THE BAZOOKA GOT ITS NAME
Back in the 1930s, Bob Burns, an American comedian and singer, built a trombone-like instrument out of two pieces of telescoping brass tubing with a whiskey funnel stuck on one end. Burns named his device a bazooka.
When played, the bazooka produces a weird warbling that sounds like a cross between a kazoo and a trombone. Since Burns was such a popular radio entertainer, his contraption also became popular, at least as a novelty, and eventually so did the word bazooka. When Burns first coined the phrase, it was taken to mean any strange, stove-pipe-shaped gizmo.
In the early years of World War II, a group of army scientists were looking for a name for a new type of rocket cannon that they had just invented. One of the engineers in the group suddenly had an idea. He looked over the odd-looking gun carefully and then called out that it looked "just like Bob Burns's bazooka." The name stuck.
The new weapon was quickly developed and issued to Allied army forces fighting the German army in Europe. Initially the device had a few bugs, but it was quickly improved through battle testing. Eventually the bazooka became an important part of the army's arsenal.
MATERIALS
• General purpose glue or hot glue gun
• (1) 3-inch inside diameter (ID) smooth-to-female pipe thread PVC adapter
• (1) Thick-walled cardboard tube, 3-inch ID, 4 feet long
• (1) 3-inch male pipe threaded plug
• (1) ½-inch PVC pipe, 5 inches long
• 18-inch length of two-conductor 18-gauge speaker wire
• (1) Two-hole rubber stopper, small enough to fit inside the beverage bottle
• Electrical tape
• (1) Piezoelectric gas grill replacement igniter
• (1) 1-inch square wood dowel, 4 inches long
• (1) 2 ½-inch steel corner brace
• (2) 4-inch diameter hose clamps
• Bottle of rubbing alcohol
• 2- to 2 ½-inch diameter, 10-inch long empty and clean plastic carbonated beverage bottle
TOOLS
• Drill and ¾-inch wood drilling bit
• Wire clipper/stripper
• Screwdriver
• Safety glasses
BUILD THE BEVERAGE BOTTLE BAZOOKA
1. Apply glue to the interior of the 3-inch diameter threaded PVC adapter. Push the adapter onto the end of the cardboard tube. Allow the glue to dry.
2. Drill a 7/8-inch diameter hole in the center of the flat part of the threaded plug. Insert the ½-inch PVC pipe through the hole until it extends approximately halfway in. Glue the pipe into place using glue or hot glue and let dry.
3. Strip off ½ inch of insulation from both ends of both conductors of the speaker wire. Insert the speaker wire into the ½-inch pipe until it exits the other end.
4. Pull apart the conductors for two inches from both sides of the speaker wire. Insert one conductor through each hole in the rubber stopper. Then push the rubber stopper firmly into ½-inch pipe as shown in diagram 1.1. Use electrical tape to keep the exposed copper wire in the conductors extended from the end of the stopper and separated by about 3/16 of an inch.
5. Drill a hole slightly larger than the diameter of the body of your piezoelectric igniter in the middle of the square wooden dowel as shown in diagram 1.1. (This is typically about ¾ inches, but check before drilling.) Insert the igniter into the hole and glue.
Use two of the screws that came with the steel corner brace to attach the brace to the square dowel. Check diagram 1.1 for the correct orientation.
6. Most replacement piezoelectric igniters come with a wire connector harness. One end of the wire connector harness connects to the electrodes and the other end connects to the spark maker on the grill. For our purposes, we do not need that grill hardware. So simply insert the wires into the appropriate electrode connectors on the piezo igniter and then use a wire cutter to cut off the unneeded grill spark-making hardware. You can discard the unneeded hardware.
7. Make wire-to-wire connections between the speaker wires' exposed conductors trailing from the ½-inch PVC pipe as shown in diagram 1.4. Wrap the connections with electrical tape.
Test the device by pressing the button on the piezoelectric igniter. If you've done everything correctly, you should see a spark jump between the two exposed conductors. If you don't see a spark, check the spark gap for width, review diagram 1.4, and rewire as needed.
8. Use the hose clamps to attach the piezoelectric trigger to the bazooka body.
Using Your Beverage Bottle Bazooka Safely
Be aware that your bazooka packs a mighty wallop! While I've never had any trouble, as always, your safety is important, so:
* Wear safety glasses (and if your ears are sensitive, ear plugs).
* The bazooka can shoot empty plastic bottles more than 100 feet. Clear the area in front of breakable objects. Never aim the bazooka at anything you don't want to hit.
* Be careful with rubbing alcohol. It is flammable.
* Inspect the bottle after every firing and discard when it becomes worn.
* Always obey local laws and regulations. Check with authorities prior to using if you're unsure about this project's legality in your area.
READY, AIM, FIRE
1. Place a ½ teaspoon of fresh rubbing alcohol in the beverage bottle. Shake the bottle vigorously with your hand covering the mouth of the bottle. Remove your hand and shake out any excess liquid alcohol.
2. Add air back into the bottle by waving it forward through the air four or five times with the bottle mouth uncovered.
3. Quickly insert the bottle onto the ½-inch pipe connected to the threaded plug.
4. Securely screw the plug into the threaded adapter.
5. When ready, press the button on the igniter. Instantly, the alcohol in the bottle will ignite, causing the bottle to rocket forth from the bazooka with amazing energy.
Enjoy your work!
HOW THE BAZOOKA WAS INVENTED
Prior to World War II, the only way to stop a tank was to blast a hole in it with a large cannon. That meant that armored tanks were pretty much invincible to anything an unarmored infantry platoon could throw at them. But in late 1940, a Swiss engineer named Henri Mohaupt designed a new type of bomb. His invention was an explosive shell that focused the blast into a narrow point of energy capable of penetrating thick armor. It was well adapted to use against armored vehicles because unlike the antitank ammunition shot from cannon barrels, Mohaupt's antitank grenade would work even when it hit a tank at a relatively slow speed.
If a soldier could run up and place this bomb on a tank, it would be possible that for the first time, infantrymen could destroy tanks. This weapon became known as the M10 grenade. Although relatively light, it was still far too heavy for a soldier to toss any distance, and few foot soldiers could get close enough to a German tank to make the attempt.
In 1942, Lt. Edward Uhl, a scientist at the US Army Ordnance Office, was tasked with finding a way to hurl the recently developed M10.
Uhl decided to try attaching the grenade to a rocket and then aiming the rocket at the tank target. The army wanted a grenade launcher as soon as possible, so the development timeline for the project was very short. It didn't take long for Uhl to assemble a prototype by adding propellant, a gas trap, an igniter, and stabilizing fins to an inert grenade. The first test of the rocket grenade took place on a dock on the Potomac River at the army's Aberdeen Proving Grounds in northern Maryland. The results of Uhl's rocket design were exceptionally good. The improvised weapon flew straight and far into the river channel, pretty much where Uhl aimed it.
Now the problem was to design a portable launcher that could hold and aim the M10 and be portable enough for a single man to carry. According to Lieutenant Uhl, the answer occurred to him in a flash of insight.
"I was walking by this scrap pile, and there was a tube that ... happened to be the same size as the grenade that we were turning into a rocket. I said, 'That's the answer! Put the tube on a soldier's shoulder with the rocket inside, and away it goes.'"
A member of Lieutenant Uhl's team suggested that he attach handgrips to the launch tube to make it easier to handle. Next, he rigged up an electric igniter that sent a charge through a wire to the rocket when the trigger was pulled. At that point, the initial design was more or less complete and all that remained was to test it.
Uhl took the test bazooka back down to the river's edge and put on a welder's mask and gloves. A small group of observers watched. Uhl aimed his rocket out toward the river and squeezed the trigger. Not only did the rocket fly true, but there was little recoil and exhaust to affect the gunner.
Another, more extensive test yielded even better results. With an army general watching closely, Uhl and his team scored a direct hit on a moving tank. People in attendance cheered, and the general asked if he could have a try. After a few minutes' explanation as to how the trigger and sighting worked, the general gave it a try. He also scored a direct hit.
Bazookas have been an important part of the military arsenal ever since.
CHAPTER 2
THE HYDRO SWIVEL GUN
Engineering your own high-performance squirt gun isn't hard if you know some science and are willing to experiment. The science of moving water under pressure is called hydraulics, and the Hydro Swivel Gun is a mixture of basic hydraulic design and the ability to use tools to bring a simple design to reality.
This project can be made in two ways, one a bit more complicated than the other. The first design uses several basic hydraulic components — a cylinder, a piston, two one-way valves or check valves, and a nozzle to produce a high-volume, infinite-capacity water squirter.
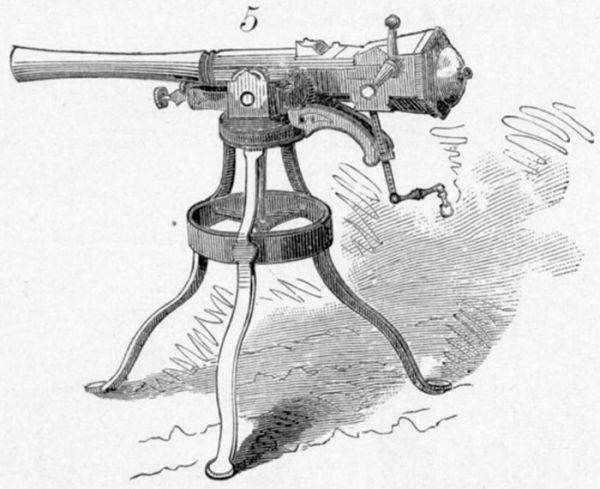
The second design eschews the check valves and some plumbing to make a simpler but still great performing squirter. The design of either gun was inspired by the small deck cannons called swivel guns that were used on naval ships in the 1700s and 1800s, the time known as the Age of Sail.
The naval swivel gun, sometimes referred to as a peterero by old-time sailors, was a wickedly powerful but small cannon. It was typically mounted on a universal joint bearing so it could be easily maneuvered into position to shoot in any direction. Lightweight and possessing a high rate of fire compared to heavier weapons, the swivel gun was an important part of the armament of Adm. Horatio Nelson's English navy during the Age of Sail.
Many 18th- and 19th-century naval commanders placed great value upon their swivel guns because they were simple and economical. While it took a crew of 6 to 15 men to operate a big gun like a 24-pounder, a swivel gun was light and easy to load, meaning a couple of gunners could manage it quite easily. And while a swivel was tiny compared to long-range guns, it packed a wallop at close range.
By following the instructions on the pages that follow, you can build a high-power, infinite-capacity swivel gun out of easy-to-obtain materials. Unlike those under the command of Lord Nelson, our swivel gun shoots not iron balls but a powerful, high-volume jet of water. This design uses a couple of easy-to-find plumbing fittings called check valves to provide the ability to draw your ammo from any convenient water source, such as a bucket or a lake, on the pull stroke and shoot that water with authority on the push stroke. It's about the most powerful squirt gun you'll ever see!
Making the Hydro Swivel Gun will take anywhere from a few hours to a full day, depending on how handy you are. But once you see how well it shoots, you'll find it's worth the effort!
MATERIALS
• 1 ¼-inch ID PVC pipe, 2 feet long
• (1) 1 5/8-inch ID, 3/16-inch wide O-ring & #149;(2) 1 ¼-inch PVC caps
• (1) 1 ¼-inch PVC coupling
• 2-inch ID PVC pipe, 2 feet long
• (2) 2-inch PVC caps
• ¼-inch NPT industrial male pneumatic connector
• ¾- to ¼-inch NPT reducing bushing (This may be hard to find, but you can use a ¾ to ½ bushing and another ½ to ¼ bushing instead)
• (2) ¾-inch PVC check valves
• (3) ¾-inch close pipe nipples
• ¾-inch PVC tee with female pipe threaded openings
• (2) ¾-inch NPT nuts (Check the electrical department of any hardware store; ask for "conduit nuts")
• ¾-inch male NPT to ¾ hose barb connector
• ¾-inch ID hose, 2 ½ feet long
• PVC cement and primer
• Silicone grease
• Pipe sealant
* Omit these parts if making the simplified swivel gun. See page 16 for details.
TOOLS
• All-Purpose Measuring Tool Assortment
• Electric drill
• 1 5/8-inch drill bit
• Sandpaper
• 1-inch drill bit
• Pipe wrench
BUILD THE HYDRO SWIVEL GUN
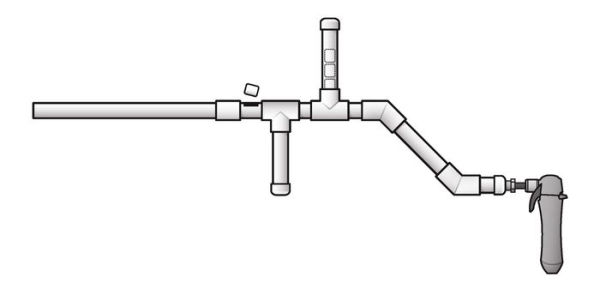
The Hydro Swivel Gun is made up of two main sections — the plunger and the squirt-suction head. The plunger is a close-fitting piston that the squirt gunner extends and retracts in order to draw water in and out.
The squirt-suction head controls the flow of the water, allowing water to enter the plunger tube when the plunger is retracted and spray out of the nozzle when the plunger is pushed forward.
1. Begin by examining the detail on diagram 2.1. Cut a 2-inch-long segment from the 2-foot-long 1 ¼-inch diameter PVC pipe. Slide the O-ring over the pipe and center it. Note that the short pipe with the O-ring on it fits between the 1 ¼-inch cap and coupling. The purpose of the O-ring is to seal against the 2-inch pipe but still allow one pipe to slide easily upon the other.
2. Drill a 1 7/8-inch hole in the center of the one of the 2-inch caps. Use sandpaper to enlarge the hole until the 1 ¼-inch diameter pipe can slide through with no interference. (The 1 ¼-inch dimension refers to the inside diameter of the pipe. The pipe has a roughly 1.67-inch outside diameter.)
3. Drill a 1-inch hole in the center of the other 2-inch cap.
4. You are ready to assemble the squirt-suction head. Refer to diagram 2.2 to review the details of how these parts fit together. Be sure to note the flow direction on the check valves (there are arrows molded into the plastic showing this) and make sure they agree with the arrows on the diagram.
5. After completing the squirt-suction head, attach the assembly to the plunger. Diagram 2.3 shows how to fit the parts together. Use the pipe wrench to fasten a conduit nut on each side of a ¾-inch close nipple to secure the squirt-suction head assembly to the 2-inch end cap with the 1-inch diameter hole, as shown on the right side of diagram 2.2.
You'll need access to the O-ring from time to time in order to grease it, so don't solvent-weld the cap with the larger hole to the pipe. Use PVC cement and primer to seal the other caps to the PVC pipes; diagrams 2.1 and 2.3 both indicate which caps to seal and the one to leave accessible. (See the appendix for detailed information on how to solvent weld PVC pipe.)
6. Use pipe sealant around the conduit nut connections (as well as any other places you notice leaks).
AVAST, ME HEARTIES!
To operate your swivel gun, lubricate the O-ring with plenty of waterproof grease. Then extend the hose into a bucket or pond. Pump the 1 ¼-inch pipe back and forth until the gun sprays water.
Feel free to experiment with other nozzle sizes and shapes until you get the sort of water action you like best. You can suspend the gun from ropes or place it on an improvised stand to turn your hand cannon into a full-fledged swivel gun.
THE SCIENCE BEHIND YOUR HYDRO SWIVEL GUN
The Hydro Swivel Gun is what hydraulic engineers would term a "two-valve forcing pump." It's pretty much based on the action of check valves. Check valves are simple little devices that allow fluid to flow in only one direction.
(Continues...)
Excerpted from Ready the Cannons! by William Gurstelle. Copyright © 2017 William Gurstelle. Excerpted by permission of Chicago Review Press Incorporated.
All rights reserved. No part of this excerpt may be reproduced or reprinted without permission in writing from the publisher.
Excerpts are provided by Dial-A-Book Inc. solely for the personal use of visitors to this web site.