

The Homebrewer's Garden, 2nd Edition: How to Grow, Prepare & Use Your Own Hops, Malts & Brewing Herbs
216


The Homebrewer's Garden, 2nd Edition: How to Grow, Prepare & Use Your Own Hops, Malts & Brewing Herbs
216Paperback(Second Edition)
-
PICK UP IN STORECheck Availability at Nearby Stores
Available within 2 business hours
Related collections and offers
Overview

Product Details
| ISBN-13: | 9781612126869 |
|---|---|
| Publisher: | Storey Publishing, LLC |
| Publication date: | 05/17/2016 |
| Edition description: | Second Edition |
| Pages: | 216 |
| Sales rank: | 522,964 |
| Product dimensions: | 6.00(w) x 8.90(h) x 0.60(d) |
About the Author
Read an Excerpt
CHAPTER 1
Homegrown Hops
Because it is easy to grow, so they should be in every garden; every landowner should devote a small area to them sufficiently large to allow in a good hop year enough hops to be grown for his own house brewery.
— Johannes Gottfried
Hahn, Die Hausbrauerei, 1804 This advice still sounds good today. Hops are a versatile crop that can be grown for both ornamental and practical purposes. They are attractive plants that make great arbors, wreaths, arrangements, and, of course, beer. Every homebrewer who owns a piece of land should try his or her hand at growing a few hop bines.
When you grow your own hops, you can pick them at their absolute peak of readiness. As soon as hops are picked, they start to lose the essential oils needed for good flavor and aroma. The best way to know that your hops haven't been sitting on a shelf for a year is to grow your own. Commercial whole hops, the least processed form available, have been cut down, run through a picking machine, dried, baled, shipped, repackaged, and shipped again before reaching your homebrew store. Inevitably, some of the hops' bitter resins and essential oils are lost during processing. Your own hops will never have to run that gauntlet, making them fresher, more aromatic, and better for brewing than any you could buy. Homegrown hops have a fresh earthiness that adds a delicious immediacy to the beer-drinking experience. The aroma alone will be enough to convert you, to say nothing of the flavor.
You can also save money growing your own hops. Once the initial investment of a few dollars per plant is made and you've bought your trellis materials, there will be few other expenses beyond the time you spend tending the plants. For an average batch of beer, you can spend three dollars just for the hops in a homebrew store. This translates into a fair amount of money if you brew frequently. You can dramatically reduce this bill, or even eliminate it altogether, if you're willing to go to the trouble of growing all of your own bittering and aroma hops.
The best reason of all to grow hops may be a spiritual one. A fine, lush trellis of the green, prickly vines, heavy with hop flowers, says as well as anything else that you are a serious homebrewer. And believe us, your guests will be extremely impressed when you tell them that you grew the hops in the beer they're drinking.
Hop Facts
Anatomy: There are both male and female hop plants, but for beer making only the female is important. Females produce scaly cones about 1 inch (2.5 cm) long that are loaded with lupulin, a yellow powder that contains the bitter resins and essential oils that give beer its flavor. The cones hang in clusters. The "petals" on the cone are called bracteoles and hide the lupulin glands.
The coiling green vines are also called bines — the botanical term for twining vines. The bines are covered with a thick growth of large, spiky leaves shaped something like cucumber leaves. The bines grow from thick rhizomes, which are underground stems that look like fat roots. The entire root-and-rhizome structure is called a crown. New hop plants are usually grown from rhizomes divided off other hop crowns.
Properties: The hop plant (botanical name: Humulus lupulus) is a vining perennial, meaning its vining tops will grow year after year from the same roots if cared for properly. The plant has a very vigorous growth habit, sending up long, spiny shoots that can reach up to 30 feet (9 m) in height. The plant can tolerate poor soil but grows best in rich ground and is hardy to zone 3. It likes moisture and plenty of sun.
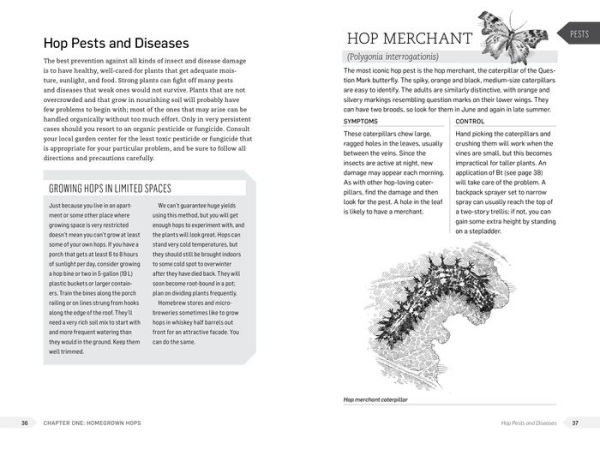
The rhizomes spread underground almost as fast as the bines do above ground. Vines need regular pruning each year, and even the rhizomes benefit from root pruning every 3 years. Hop vines require a strong, permanent structure to support them, such as a trellis or pergola. All other things being equal, the taller your bines can grow, the more hops they will produce, which is why commercial hop trellises are so tall.
Though hops will grow about anywhere, they produce best at high latitudes, 45 to 48°N, where the long summer days foster growth of the bines, and then rapidly shortening days promote cone development.
Humulus lupulus: The Friendly Hop
Cultivating hops is easy; all they really need is reasonably fertile soil, plenty of sunlight and moisture, and something to climb on. Hops are so vigorous, in fact, that their tendency to run wild in cultivated fields is commemorated in the second part of their botanical name: Lupulus means "wolflike."
The cone blossoms of the female vine are what homebrewers are concerned about. They contain lupulin, a yellowish powder that contains the bitter resins and essential oils that give beer its flavor and aroma.
Acquiring Rhizomes
If you live in a hop-producing area, such as the Pacific Northwest, you can probably get hops directly from a nearby commercial grower, and they will probably do well for you because they may have been selected to thrive in that local growing area. Finding such sources locally is easier than it used to be since hop yards, like malt houses, are returning to areas that haven't seen them for a hundred years. There is a new commercial hop yard in the next town over from ours, and a new brewery in our small town, all part of the renaissance of craft brewing in America.
You can also appeal to local home growers for rhizomes. Since some growers root-prune in the spring, they may be able to put some aside for you. Otherwise, you can order hop plants from one of the sources listed in appendix B, or get them from a homebrew store.
Hop rhizomes are available from most well-stocked homebrew stores in early spring. Usually they will be large, lumpy roots about a foot long, or they could be as short as a few inches.
The rhizomes you buy are all female, because the hops used in beer are the flowers of the female hop plant. Without a nearby male plant they will not produce seeds, similar to another plant in the same family. Hop rhizomes usually cost about five dollars each, cheap when you consider that you'll never have to buy any again unless you want more varieties.
Hop Rhizome Checklist
APPEARANCE
* Plump, not dried out or withered
* Healthy, not dead- or diseasedlooking
* May have new white sprouts and rootlets
TEXTURE
* Firm to the touch, no soft spots
CARE UNTIL PLANTING
* Keep in a cool, damp place; wrap in newspaper, damp sawdust, or peat moss to prevent drying out.
Experimenting with Different Varieties
Your homebrew-supply store owner will probably be able to recommend which hops will grow best in your region or at least put you in touch with other local growers.
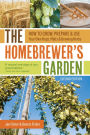
Here is a good rule for growing hops (or any other kind of plant): "If it can't live like we do, we don't want it." If a particular variety grows up looking sickly, with brown leaves and flowers, or is constantly attacked by insects or diseases, dig it up and try something different. For this reason you shouldn't plant rhizomes of only a single variety the first year, even if you prefer a particular kind of hop. Other varieties may do better in your area, and you don't want to waste a lot of time and effort caring for plants that would rather be growing somewhere else. Unhealthy plants won't produce good yields, so get plants that like your land.
Grow at least three or four different kinds to start. Watch how they perform, and keep the varieties that do the best. Health is the top priority; other hop qualities are really secondary when you are growing your own. Your hops may have very different characteristics than the ones of the same variety you buy in the store, because climate, soil composition, altitude, and other factors will influence your crops to some degree. This difference can result in some highly individual beers.
When choosing which hops to grow, bear in mind your location and how long a harvest season you want. If your area has a short growing season, you should grow hops that mature early. If you have a longer growing season and want to stretch out your harvest, combine early hops with some that mature later. As a general rule, German- and Czech-style aromatic lager hops don't produce as well in North America as ale-type hops (for some exceptions, see Fuggles and Perle in the Hop Directory). You may notice that we don't include specific alpha acid percentages for each hop variety in our chart. That's because alpha acids are not an absolute value — they vary from crop to crop, year to year, and place to place. As a rule, alpha acid percentages are higher within the same varieties for homegrown hops than for commercially available hops. We should also note that when a hop variety that you purchase at a homebrew store has a place name before it (for example, B.C. Goldings and East Kent Goldings), it indicates where the hop was grown and not a different variety. In this case, B.C. Goldings are from British Columbia, Canada, while the East Kent Goldings hops are grown in England. Since geography plays a large role in a hop's final characteristics, these Goldings will differ just as the hops you grow in your backyard won't turn out exactly like the store-bought varieties you are used to using.
Hop Exploring
Hops are one of the useful homestead plantings that can persist in an area long after the homestead itself has vanished. Any place with a history of hop growing is a good place to go hop exploring. This is particularly true of many places in New York and New England, especially Maine and Massachusetts; the northern reaches of the West Coast; and the great midwestern brewing zones like Milwaukee, Wisconsin. Old maps and town histories can help the hop explorer find where hops were grown. Or you can just luck onto them, like friends of ours who moved to Thorndike, Maine, near the Maine Organic Farmers and Gardeners Association's Common Ground fairground, and found their new backyard overgrown with hops. Though wild hops were growing in North America when Europeans arrived here, you are more likely to find feral hops, ones that were once cultivated and are now growing on their own. Wild hops tend to be smaller than cultivars and have a lower alpha acidity, though this is not always the case. A lush, superior wild hop found in Canada is one of the parents of the Wye varieties like Target, and Amarillo is the unmodified clone of an unknown seedling.
You will want to get female plants, and until they flower you won't know the sex, so cruising for wild hops is best done in the late summer or fall depending on the area. Male plants produce typical-looking flowers rather than cones.
You might ask, why would anyone bother with "wild" hops when new and proven varieties are available at every turn? Potent bragging rights are one reason, but in a more practical sense, local feral hops should be well adapted through many generations to local growing conditions. They will likely do well in your hop yard, perhaps outperforming introduced varieties. The idea of conserving an old variety is also appealing to many of us.
Hops, like grapes, are understory plants that like a lot of sun. Look in old fencerows, rock walls, hedges, chain-link fences, or any boundary around old growing areas for hop survivals. Commercially grown hops would almost always have been transported by water, so hop yards would have been found near rivers, canals, and seaports. Our favorite variety is a feral hop discovered by a University of Maine professor and passed along to us by our cousin Tina Roberts, who was a student of his. This hop, which we call Orrington after the Penobscot River town where it was discovered, is supposed to be descended from a bootlegger's brewery of the Prohibition era, but it might easily be older, since hops were grown commercially here at least since the late 1800s.
Our friend Brad Hunter found a hop plant growing on Matinicus to save it from lawnmowers until he could come back and harvest some rhizomes. In another example of island survival, someone recovered a hop from the ancient garden plot of Celia Thaxter, an artist living on the Isles of Shoals in the nineteenth century. This hop must have survived, untended, on a rocky nutrient-poor storm-wracked island for a hundred years. This kind of resilience, the ability to thrive practically anywhere, is a signature of this remarkable plant. Hops never give up.
Make Friends with Local Hop Growers
Getting rhizomes and advice from local growers is the best method we know to start out right with your hop growing, for three reasons. First, you already know that the hop variety they are growing will do well in your region. Second, you can get firsthand growing tips. Finally, most hobbyists offer rhizomes for free. Ask your homebrew store or fellow homebrewers for leads to track down backyard hop growers near you. If you live in the United States and don't know of any homebrewers living near you, you can contact the American Homebrewers Association for a list of clubs in your region.
The Hop Yard
In the traditional hop yard, a hop hill was literally a hill: a mound of earth piled up for the hops to grow in. Most home growers don't go to the trouble of piling up soil and instead just dig a hole for the hops. For the purposes of this book, a hop hill is just a defined area where a hop plant is growing, whether or not it is in a raised mound.
However, a round raised bed probably helps the soil heat up early to promote hop growth, and it may make root pruning easier, since you just cut back the sides of the hill. It also can help in low, wet growing areas to keep the roots drier, because hops hate wet feet. Most books talk about annual root pruning for hops, but we've never done this except to harvest rhizomes to pot up for sale. Root pruning is used to contain the hop plant's exuberant growth in one area, and to keep varieties separate. Ours have never spread so aggressively that we needed to contain them. Different varieties should be planted in hop hills at least 2 feet apart to prevent confusion. You can usually trace a bine back to its parent hill before training, and if in doubt just prune it off.
Siting the Hop Yard
Ideally, the hop yard should be a site with full sun and good air circulation. The number of hops you plan to grow will determine its size. Hops are usually grown in hills 2 ½ to 3 feet (76 to 90 cm) apart, with one or two rhizomes per hill. For five plants, you will need a bed 15 feet long by 3 feet wide (about 5 m by 90 cm).
To ensure an even, square bed you can lay out the area with stakes and strings beforehand. The hop bed can be located in the middle of the lawn if that's the best location you can find. If you're starting with lawn, cut and remove the sods with a spade. Make sure to get out all the grass and weed roots. If you don't plan to plant right away, cover the bare soil with a layer of mulch to prevent weeds from taking hold, or you can seed a cover crop like buckwheat or field peas to improve the soil and crowd out weeds. You'll need to mulch after planting, too; good, deep mulching is the secret to excellent hops.
Ideal Site Checklist
Try to plant in an area with as many of the following characteristics as possible:
* Southern exposure for full sun — minimum of 6 to 8 hours of sun per day
* Good air circulation to help prevent diseases
* An existing wind break to prevent bine damage
* Plenty of vertical space, to allow for bines reaching heights of up to 30 feet
* Good drainage
* Access to water hose
* Existing structures that can be used for trellising
(Continues…)
Excerpted from "The Homebrewer's Garden"
by .
Copyright © 2016 Joe Fisher and Dennis Fisher.
Excerpted by permission of Storey Publishing.
All rights reserved. No part of this excerpt may be reproduced or reprinted without permission in writing from the publisher.
Excerpts are provided by Dial-A-Book Inc. solely for the personal use of visitors to this web site.
Table of Contents
Introduction: The Advantages of Growing Your Own Chapter 1: Homegrown Hops Chapter 2: Brewing Herbs Chapter 3: Homegrown Grains & Homemade Malts Chapter 4: Beer Recipes Glossary USDA Hardiness Zone Map Appendix A: Measurements and Conversions Appendix B: Sources for Garden and Brewing Supplies Bibliography and Suggested Reading IndexRelated Subjects
Customer Reviews
Explore More Items


